Showing posts with label chibi. Show all posts

Monday, November 10, 2014

Chibi Kyubey Pattern

Chibi Kyubey FREE Pattern

Use the link above and you can have your very own Kyubey instructions to make your own little soul sucking adorable alien cat thing.

This was a requested pattern by u/saleina from over on Reddit.

I sort of rushed the embroidery on this guy so I could finish up the pattern with a completed photo.  At some point I will try redoing the mouth.  But for now I need to get back to working my fingers off on getting as many ami's finished to shoot off to RESOBOX Gallery as possible!

If anything is unclear, or doesnt make sence let me know and I can help you work it out!


Tuesday, July 29, 2014

Ta-done! Water Dragon

Instead of horns that I normally do on other dragons I opted to do seaweed tendrils.  I also added smaller patches of seaweed to the arms as you can see in the back image, but I wound up removing them they where not fuzzing up and looking light and airy like the sections on the head.  Due to it being a water dragon I went with making a longer finned tail and no hind legs.

 
I did an indoor shoot today because I realize the last few blue items I photographed out on my bench just got sapped of color by the silvering wood and I wanted the colors to show clearly.

Yes, there are no wings.  I thought about it in a practical manner and if it was swimming in the water the wings would cause to much drag and wouldn't be practical. Also it might make it too busy looking with all the details


Monday, July 28, 2014

WIP Water Dragon

This is my take on the Water dragon from my element set I have been working on the past week.

I unspun some navy, purple, and light blue and used the the singles held with the working yarn to get this effect, light to dark as I worked own.

I got a close up of the eyes I painted, they where clear cat eyes 7mm and now they are lavender dragon eyes.  I wish I had been able to get 8mm eyes but they didnt have them in that size still I think in person these look realy stunning.     
            
I need to take a day and paint up 20+ set's of eyes as my stock of hand painted is slowly being used up.

I plan on adding a little surprise element to this guy but not sure how it will look so I have to play with placement of it.


Wednesday, July 23, 2014

Some more Octo's and Dragons!

 Just an update on things I am making.


I finished off a Storm/Rainbow Octo, and a yellow and navy Octo.

I swapped over to doing dragons, I finished an orange and yellow firy dragon, and a brushed white and blue airy dragon.

I opted out of doing horns on the Air dragon for the fluffy wispy ears and chest ruff.

Debating on making an earth and water pair next.  Unsure what colors I would pick for them as brown isnt a popular color in the dragons and I am not sure how to do a blue water dragon that doesnt just look like the air one.

Tuesday, June 3, 2014

Newest Chibi Dragon to join the bunch...

Meet Kisses.  She is chocolate brown, and silver with light purple eyes.

The colors just made me think of Hershey's kisses so thats where she got her name.   
      
I have decided to hold off on working on puting together a pattern till after the convention I am going to sell at so I have more time to work on things to sell.

This does not mean I wont start on it, but dont expect it soon.

Any suggestions for color combos anyone would like to see the pattern dragon worked up in?  Think of what will photograph well, so white and black are both out the window.  I was thinking of digging threw my stash to see what I have, I know I have left over colors from my rainbow granny that are more then enough to make a dragon, and many diffrent shades of those colors.


Saturday, May 31, 2014

Fear the Con 7 June 13-14 (St Louis gamers convention)

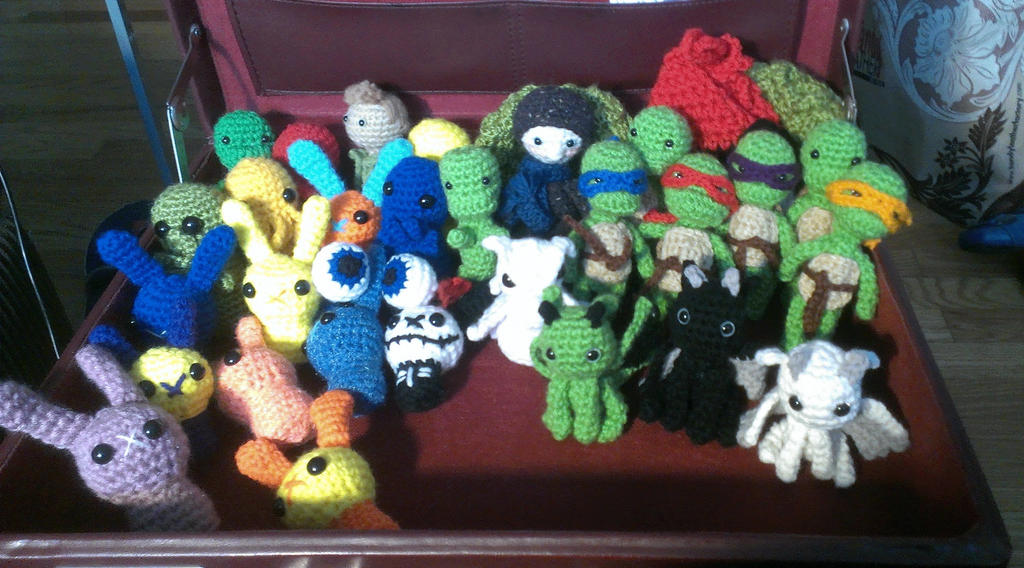
This is the selection I plan on hauling with me to Fear the Con 7 June 13th - June 14th, 2014 at the Maryland Heights Centre.

 This is, a winter chibi, a Dean chibi, a dinosaur, a owl, 2 blue eyes (cats love these), 3 generic turtles (so they can be customize later), one full set of TMNT will be sold as a set (unless it gets to mid 2nd and no interest is shown then I will brake them up), 3 chibi dragons, 5 cthulhu in assorted colors, 9 bunnies in assorted colors, 2 dragon scale dice bags, and a pokeball dice bag.

I am trying to decide if I should make more TMNT, or work on more dragons, or not bother with crochet and get to work on creating the Chibi Dragon Pattern.


Wednesday, May 21, 2014

Which is better? WIP


So I am going to make two version of my black chibi dragon. This first one has the eyes I hand painted with the silver blue paint I mixed myself.  I was lucky I caught some day light towards the end of a rainy day so I got a good natural light shot of these guys.

The sun kind of made his horns hard to see against the wood of my bench that has faded into a beautiful silver.  I used yarn colors Steel and Black from Red Heart.  Steel was a vintage color I picked up at a yard sale so not sure if its still a colorway you can buy.

Besides trying to decide which eyes work best with these guys (hand painted or prepainted) I want to get everyones opinion on something else.   I want to get this pattern typed up into a pdf, but I am struggling with deciding on if it should be free or a donation pattern.  I am also thinking of making a booklet pdf with all my patterns in it free and pay and having it be a donation one and the only way you can get the Chibi Dragon pattern again it would just be for donations of $1 up to how ever much the donator thinks its worth.  
  
If I go with the booklet, it will be most the patterns on the site up to the dragon one.  Any patterns that I publish after, if the booklet seems to go over well, I will bundle up to make a second booklet with an other bonus pattern that can only be gotten in the 2nd booklet.  I dont know if this sounds like a good idea or if I am just nuts.  If I do make the booklet, it is something that if/when I start doing craft fairs I can get copy's printed to take with me and sell as well.

What are your thoughts, hand painted or prepainted?
Free/Donation and if Donation should I go booklet or does that not even appeal to you.

Monday, May 19, 2014

Chibi Dragon

I worked on this little guy for 2 days trying to get a good look.

I wound up reworking the wings almost 5 times, the ears twice, and the horns I didnt bother to keep track of how many styles I went threw before settling on these.

I aam still unhappy with the finished item.  I think when I make an other I will be tweeking things like the body, tail, legs, and how I go about assembling it. 
       
I was inspired by a old photo I saw a few years ago on the web, where they are no longer being made.

What is your guys opinion?   
  
Should I try cat eyes on the next one instead of my special hand painted ones?  They seem to blend in to well with the yarn I used this time, I painted them a sea green hat has a bit of shimmer to it. 

Next one I make I think will be a black version with gray wings and horns, I was thinking of painting eyes in a silver or silver blue shimmer but maybe the cat eye pupil eyes (which I can only get in yellow/green so I cant make my own colors) would leave it with a more dragon like look.

I even commented to my husband (before the wings and horns where on) that it looked more like a frog that had its tadpol tale still.

Chibi Turtle Pattern *FREE PDF*

PDF Preview

Chibi Turtle PDF


You can now download a copy of my Chibi Turtle Pattern.  I have not gotten feedback yet from my pattern testing pool so if you catch a mistake please let me know.


Its not as detailed as my moonkin pattern but it should be easy enough to fallow, if you need any help, if something is unclear or you just thing a step sounds wrong contact me and I am more then willing to help/fix/explain.

Monday, May 5, 2014

TURTLES!

I have now worked threw my Chibi turtle pattern 4 times, and sent it out to 6 volunteers testers over on r/crochet so once I get the feed back, on the first draft of the pattern I can make adjustments and start my next turtle that will be photographed semi step by step.  I will try to provide alot of photo support for the areas where I do something that is not a typical step done in crochet, and I know I will do a step by step of the back shell as it might be the most complex part for a beginner. 

It will also have to wait till I get my laptop back from dell.  So I can do my formatting adding in all the photos and finishing edits to create the pdf file for downloading.

So I will leave you with these two shots of the guys, Mikey, Leo, Raf, and Donny.  Now rember this is a patter for Chibi Turtles, and not Ninja Turtles.  You can accessorize them how ever you like o.- (ie use the bonus patters provided with the Chibi turtle patter ((super hero mask, and belt)) to create what ever you want.)


Monday, November 25, 2013

100 Posts! Giveaway!

So I am officially over 100 posts.  I know I mentioned a while back that when I hit 100 posts I would be doing a giveaway so here it is!

Rules- Anyone, anywhere can enter.  If your are under age (younger then 18) please make sure with a parent or guardian before entering as I will need a physical address and name to send the prize to.
To enter all you need to do is to leave a comment on this post.  In the comment mention which item from the list you would like, you can leave it up to random luck and just say any, or say you want specifiably a Unicorn/Bunny/Cthulhu but you don't care which color, or you can even pick the specific one from the pictures. 
If you don't say what you want I will pick for you.
 Any double comments will be ignored as an entry so double commenting is not going to earn extra entry's.  Replies to an other comment will not count as an entry either so make sure you are making a comment on this post and not replying to someone comment.  If you decided you want something different then what you original commented just reply to your comment with any corrections. 
All comments left by Anonymous will be disregarded you need to make sure you leave a name so  when I announce the winner the prize can be claimed by the right person.
Winner will be announced in a new post which will be titled 'Winner' I will leave an email address as well as instructions on what to put in the email so that I can ship them the prize they pick.  So keep your eyes out for it and rember to leave a comment!
 Contest opens the second this post goes live, and ends December 1st 2012 at 12:00am my time (Central Time) so any comments made after that time will not count.

Prizes- One of the fallowing items
Amigurumi Unicorn - Rainbow mane or Silver mane
Amigurumi Bunny- Assorted colors see image
Chibi Cthulhu - Assorted  colors see image

Again anyone can enter, the winner will be chosen by a random number generator, numbers will be assigned to comments in the order they are left.  So friends, family, friends of family, followers, and even strangers you all have a equal chance of winning.  If enough people show interest I might let it choose three winners instead of just one.  So feel free to share this post with friends and get the word out, the more people commenting the bigger the chance for multiple winners.

I will be mailing the prize or prizes out the first week of December, so long as the winners get back to me in time, after Dec 7th if the winner(s) have not responded a new winner(s) will be announced and they will have 7 days to respond.  That way it will hopefully get where ever it is going before the holidays.  If your local (live in Missouri nearish st louis) we can meet up so you can pick up the prize in person.

Good Luck!

(All amigurumi was made in a smoke free, pet friendly environment.)

Saturday, September 28, 2013

Catigurumi Pattern

I promised this pattern a while back, sorry it took so long I misplaced my notes.

You will need an F hook, two colors of yarn a yarn needle and some stuffing and safty eyes.

As always I am using American terms, the only stitches you need to know are single crochet, increase, decrease, magic ring, and how to color change.As always if you need to know how to do the magic ring you can see my video here it shows how I started for my penguin but the concept is exactly the same.

Starting with the head/body

Mr - sc 6 (working in the main color you want the body to be)  end each round with a slip stitch into the first sc of the round and chain one
2- Increase in all stitches 12
3-Increase, sc repeat around 18
4- Increase, sc 2 repeat around 24
5- Increase, sc 3 repeat around 30
6- Increase, sc 4 repeat around 36

Row 7-8-sc all 36

9- Decrease, sc 4 around 30
10- Decrease, sc 3 around 24  Switch to belly color here when you do your slip stitch and work remaining rows in belly color. Add your eyes on now and start stuffing.
11-decrease, sc 2 around 18
12- decrease, sc1 around 12
13- Decrease all 6    leave a long tail to sew body shut and to use to attach the legs, I like to wave my tail threw the front loops of the last round and cinch it closed then weave and knot in at least 3 places.


Legs 4X
Mr sc 6
2- sc all 6
3-sc all 6
Stitch to belly I tried to keep them half ont the belly half on the body color.
Ears 2X
Worked in the round then pinched flat stitched about a row and a half from the first row.
MR 6
2- increas, sc all 9
3- increase once then sc remainding 10
4- increase, sc 4, increase sc 4 12


I did the tail in a new manner for me, its a bit tricky to explaing.  I think June from PlanetJune.com has a video that explains it better then I can.  Basicaly the tail is an I-cord done in crochet with a color change at the end if you want the tip of the tail to be 'painted'.  I made my tail about 3inches long

I hope she doesnt mind me linking her video here she just explains it so much better than I could.


When I make an other Catigurumi I will make sure to take alot of pictures to add to this post.

Ifsomething is confusing or unclean let me know and I will do my best to make it easy to understand.

Monday, September 2, 2013

Octo Amigurumi Rewrite!

I got a request to rewrite my Octopus pattern, some people where having a hard time reading the Blue font agains a grey backround.  So here it is---

Amigurumi Octo

A beginers tutorial and pattern

You will need the fallowing--
A small amount of yarn any color you like- if its balled the size of a tennis ball should be more then enough to make one or even two
A stitch marker so you can see where your rounds starts and stops-  I used to use a scrap of contrasting yarn but I have had it get pulled out on accident (I think the cats do it on purpose but i will call it an accident till I catch them) so now I just use a bobby pin and it works great but like i said you dont have to go out and buy some fancy set of stitch markers a scrap of yarn will do (unless you have kitties like mine)
Crochet hook- Any size will work but check the lable of the yarn you are using (if there is no label just the thinner the yarn the smaller the hook the thicker the larger) The smaller the hook the smaller the finished item with turn out and vice versa large hook large octo.  I just used a US size F hook because my yarn is WW
Stuffing of choice -I use polyfil
Eyes - I used Safty eyes because they are child safe , but you can felt on eyes, or sew buttons on as eyes, or even embroider on eyes!
Yarn needle for finishing.

HEAD
You can start any way you feel works best for you I show two methods for how I start


 Start A Chain 2, then make 6 sc in the second chain stitch from the hook (the first loop)

 Start B Magic Ring 6 sc  (here is a video of how to start with a magic right it was made for my Penguin but its the exact same process )
R2- Increase (Inc) in each stitch (12)

 R3- Inc, sc repeat all the way around (18)

 R4- Inc, sc2 repeat (24)

R5- Inc, sc3 repeat (30)

R6-11 SC all (30) (you will repeat this round till you have 11 rows)

 R12- This is the decrease and leg's round- you can choose if you want to work the legs as part of the body (so you dont have to sew them on later) or if you want to have more then 6 legs just work the decrease and ignore the parts in bold where I have you chain a length to add in the legs.  I am going to have you do a FLO (front loops only) decrease which means you only hook under the loop closes to you and not both loops of a stitch this leaves a more eye appealing decrease and does leave a large gap that a normal decrease can cause.
 Work one dec, 'chain 22 (or if you want the legs longer/shorter chain more/less) DC twice into the 3rd chain stitch from the hook (I tend to add 3 or 4 if I am working with a thin yarn to get the twist really started), then 2 DC in each chain (or more if you want a tighter spiral) then SC into the next st' sc2  repeat from begining You should end up with 6 legs and 24 st's

 R13-Dec sc 2 (18) The dec should fall right at the leg spirals so you can just pick up a stitch on either side of the legs and work those for the dec and sc all other stitches

 R14- Dec, sc (12)

 From here you want to finish off the work, start by attaching your eyes and any other features you may like, then stuff.  I like to weave my working yarn tail threw the front loops of the last round of stitches and cinch it tight then secure and sew it shut. If you did the legs separate this is when you should find a placing you like and sew them in. I find between rounds 12-13 look best. The images I have of my progress where worked with the legs not attached but the process is exactly the same if you fallow the pictures and work them as part of the body.


I sorta rushed threw this so if something is unclear or worded in a way you dont understand just ask and I will help out!!
Felted eyes with a Jellyfish fuffle above the legs


In the Garden with Totaro and Hello Kitty

Only one day left to go out and enjoy the Japanese Festival at the Missouri Botanical Gardens.

They did a photo shoot out in the Japanese garden with some of the amigurumi I made with other plush items they got in.  I was so excited to see the post go up on there Facebook page, but really devastated when I realized all the comments where pretty much negative and all by the same person and having nothing to do with what the post containing the picture was about.  They where all just realy negtive feed back from someone who didnt seem to like this years Festival, which is sad because I had a great time.

I just find it hard to get and stay excited about having them post my work to their page when it is now connected to all that negativity.  It would be one thing if they didn't like the craftsman ship and where actually commenting on the toys in the image, or about the Gift shop in general which is what the post is about but why post such negativity, and negativity that is not even justified (candle light walks are by defection done in the dark by candle light, and the festival she is comparing it to last year was a special one time event hosted at the garden that was Chines and separate from the Japanese festival they hold every year) in this particular post.

Not to be a stick in the mud but man I was excited when I saw it had alot of comments and now I am just upset.

I blame this rant on all the Nigori Unfiltered Sake we had at dinner. #ThanksChad for the sake

Sunday, September 1, 2013

Japanese Festival!

So we got to go out to the festival Saturday walk around and have some fun. I enjoyed the garden and even got a paper parasol painted with a Sakura tree on it to help keep the 102 degree heat off.

I have to say what I enjoyed most (besides getting to be there with my husband) was the Japanese ladies who did 4 different cooking demonstrations with samples of everything they cooked.  They als talked about how making bentos they always make sure to have 4 colors of food to make sure the kids are getting alot of the vitamins and minerals they need.

The top image, is a bento box one of the lady's moms used to pack for her to take for lunch to her kindergarten class when she was growing up in japan. 

The cooked all traditional home style items that would have been something they ate when growing up in japan and items they still cook today for their kids here in the US.

The items they made where--
Stuffed Lotus Root (In the bento box it is the item on the far left) which is two thin slices of lotus root with a ground meat mixture sandwiched between then lightly pan fried with a pan sauce over.  These where crunchy and only slightly sweet.  I plan on trying to make them for dinner one night, or even make a larger batch to take to the group I game with.
Japanese Style sweet Omelet (in the sample bowl image its on the bottom left next to the fake grass) This was a very different dish for me I had never tasted anything like it.  It was not  my favorite part of the sample but it wasn't bad just different... very um not anything like you would expect.
Steamed Veg & Japanese mustard dressing (broccoli and carrots)  They had cute little metel cutters that where about 1/2 in wide they used to cut stars, flowers, and even kitty faces out of carrot slices the sauce was realy good with them I could see it turning a broccoli hater into a lover easy.
Rice Ball with Sesame and salt - Literally just rice seasoned with sesame and salt but still good.
Finally my favirt item of the sample--
Butter Mochi!!  It was a very sweet and dense style Japanese cake which I can not wait to try making!

Here are some photos of the garden grounds, and some of the bonzi that were on display.


And finaly I will end the post with an image of the gift shops display of my amigurumi.

Thursday, August 29, 2013

The Amigurumi stops here---MBG

I have finished 51 diffrent amigurumi in assorted unicorns, bunnies, and chibi cthulhu's.  I went up and delivered them all today so the stress of 'finishing' is over.  All in all I was able to make 14 Unicorns, 17 chibi cthulhu's, and 20 Bunbuns (4 of which are Skel-o-Bunbuns).

I took group shots of what I still had left to deliver but some how lost the group shot of unicorns and since I already dropped them off I cant take an other.  I will try to get a shot of the display they put them on this weekend when I go out to the Missouri Botanical Gardens Japanese Festival.  

I cant wait, I realy do hope they sell well and people like them.

 These bunnies just wanted to pile up and be unruly.  It was like bowling only with out a bowling ball the bunnies would just all decided to fall over randomly.  So their group shot is a Pile-o-Bunbuns.
Now the Chibi Cthulhu's on the other hand where more then happy to stand up and even stay in formation for their photo op.  Nothing beats a murder of Cthulhus.  Any idea what the plural for Cthulhu is?  I know a Murder is a flock of crows but I like the term for this grouping of Cthulhus.


Wednesday, August 21, 2013

Happy birthday! and Ood-er things

Ok I finally made that Ood!!  Since my wonderful hubby has a birthday this week and people have asked or mentioned Oods to me atleast 3 times this month I decided to make one.  It didn't quite work like I wanted so when I make an other (if) I will have to adjust the pattern.  I was hopping to work it all in one piece +arms, but it wound up more like five pieces. I went for natural light hoping it wouldnt wash out the color.

Tuesday, August 20, 2013

Sneak Peak of MBG work aka Image Heavy post

Ok so here is the sneak peek at what I will be taking over to Missouri Botanical Garden for the Japanese Festival that is happening Aug 31-Sept 2.  My hubby plans on taking me up on  one of the day because we have know about it the last 2 years but never actully made it up for the festival and this just makes me even more excided.

I tried my best to group them by color, but the bunbuns where not having it so most of them got solo shots. 


So much crochet -.- in so little time.  I just hope they all find homes with people who love them as much as I loved making them.  I also wish I had a better way to take photos I have been using my phone and it tends to bleed out the colors =(