So Animeggroll is having its 4th anniversary party this weekend.
They are doing a anime themed pumpkin decorating contest again but they added a no carved/cut up in any way rule this year I decided to crochet my submission. I finished it yesterday and I FORGOT to take photos of it before I took him in.
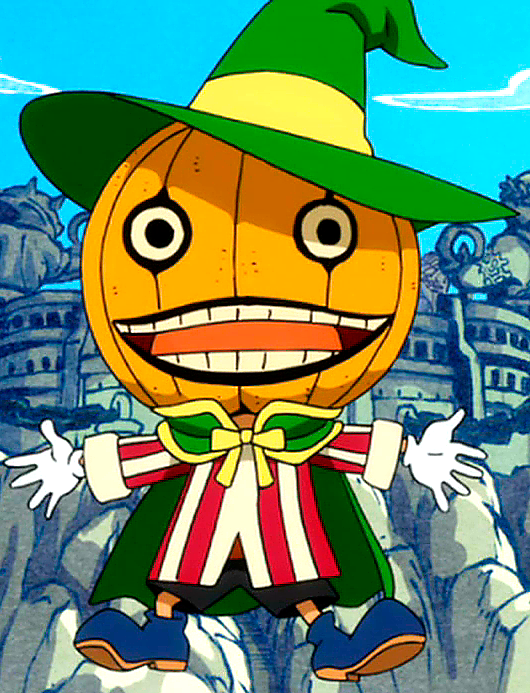
I choose to make Mato from the anime Fairy Tail he pops up doing the grand magic games arc as the Host of the games. His catch phrase is 'Kabo' which is Japanese and short for kobocha which means pumpkin.
I am slightly dispointed with how he came out I wish I had been able to make his eyes cleaner.
I will try to get a photo of him up soon.
Ok here is Mato hanging out with his favorit Fairy Tail member Erza, and Lucy just jumped in the shot to be there.
I was out at Animeggroll tuesday and today thursday helping Cindy. She wanted to make a crazy hat so I worked out a pattern for her and this is what we wound up with when she finished it was about 60 inches long. I think she did a great job on her first hat! I sent her home with a pattern for a shorter verson of this hat, and for a tam or slouch hat. I cant wait to she what she brings into Animeggroll on Oct 15 at 3pm when we meet up for an other 'class'.
Huge shout out to Animeggroll for letting us come take up space in the back.
They are having there 3 year anniversary party this weekend on Oct 12 starting at noon, come by and have some cake!!
Animeggroll is having a pumpkin carving contest this weekend on there 3rd anniverary party.
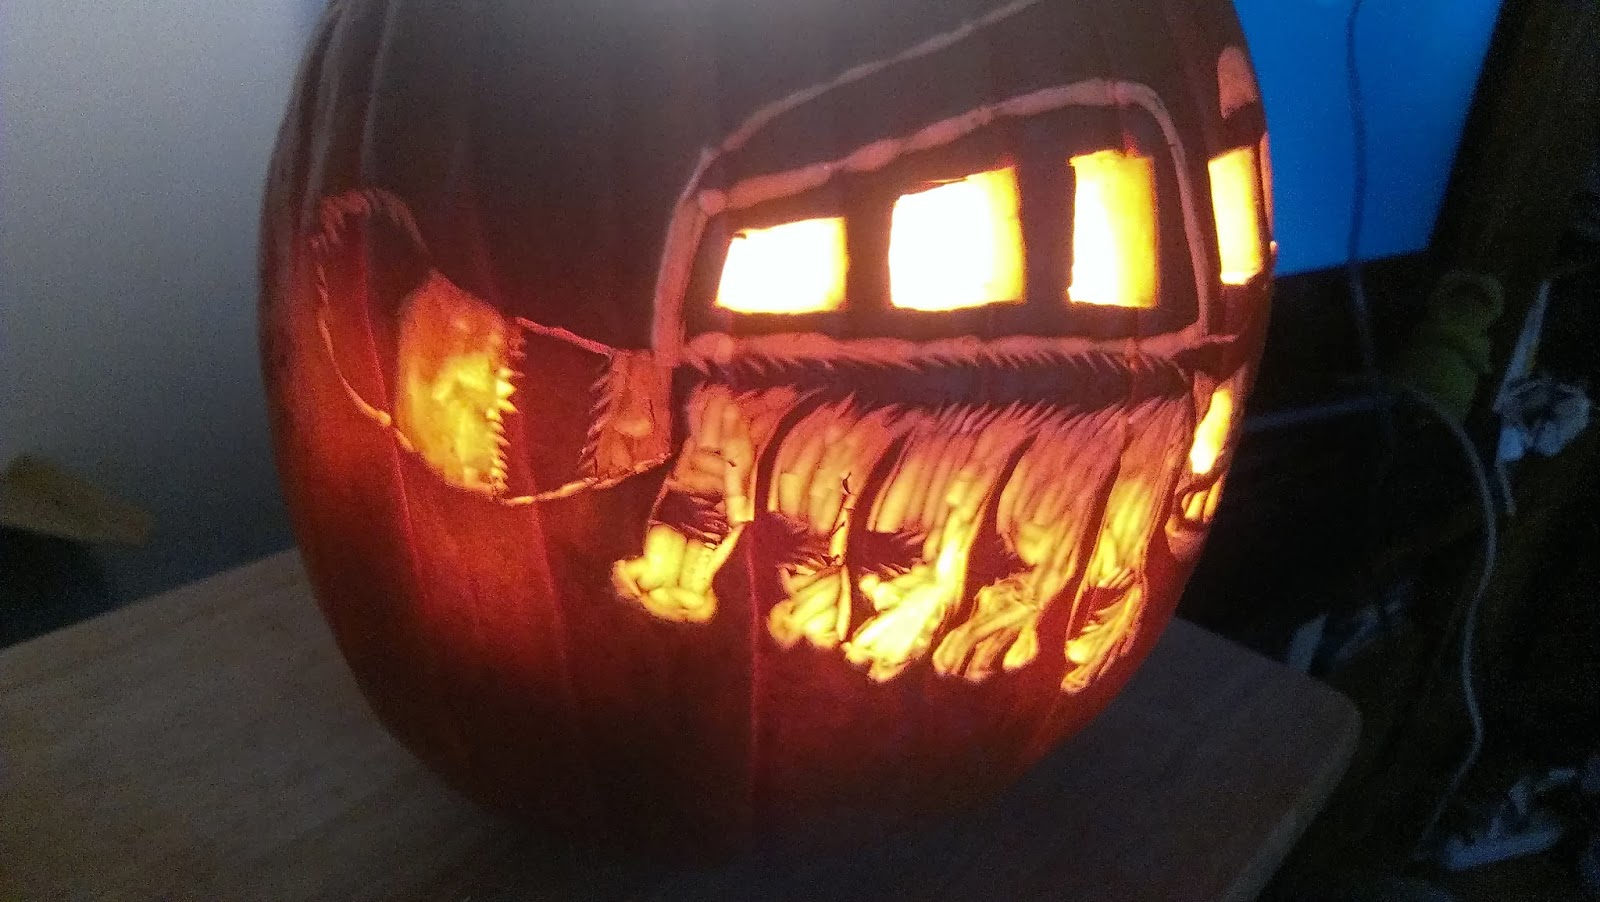
They have to be anime theamed, and I was going to do drawings/painted on of the cats of anime but I saw on of the pumpkins they aready recived and the art on it was from Nana and it was amazing! So I am going to actull crave a catbus from My Neighbor Totoro.
Since I was feeling a bit under the weather this morning crocheting is more difficult then it should be so I thought I would start sketching out my catbus on the pumpkin. The colored in sections will not be cut out i am still debating on if I will cut out the eyes or just make the wall really thin.
This Pumpkin was not made by me, Luthor over at Animeggroll carved it.
I promised this pattern a while back, sorry it took so long I misplaced my notes.
You will need an F hook, two colors of yarn a yarn needle and some stuffing and safty eyes.
As always I am using American terms, the only stitches you need to know are single crochet, increase, decrease, magic ring, and how to color change.As always if you need to know how to do the magic ring you can see my video here it shows how I started for my penguin but the concept is exactly the same.
Starting with the head/body
Mr - sc 6 (working in the main color you want the body to be) end each round with a slip stitch into the first sc of the round and chain one
2- Increase in all stitches 12
3-Increase, sc repeat around 18
4- Increase, sc 2 repeat around 24
5- Increase, sc 3 repeat around 30
6- Increase, sc 4 repeat around 36
Row 7-8-sc all 36
9- Decrease, sc 4 around 30
10- Decrease, sc 3 around 24 Switch to belly color here when you do your slip stitch and work remaining rows in belly color. Add your eyes on now and start stuffing.
11-decrease, sc 2 around 18
12- decrease, sc1 around 12
13- Decrease all 6 leave a long tail to sew body shut and to use to attach the legs, I like to wave my tail threw the front loops of the last round and cinch it closed then weave and knot in at least 3 places.
Legs 4X
Mr sc 6
2- sc all 6
3-sc all 6
Stitch to belly I tried to keep them half ont the belly half on the body color.
Ears 2X
Worked in the round then pinched flat stitched about a row and a half from the first row.
MR 6
2- increas, sc all 9
3- increase once then sc remainding 10
4- increase, sc 4, increase sc 4 12
I did the tail in a new manner for me, its a bit tricky to explaing. I think June from PlanetJune.com has a video that explains it better then I can. Basicaly the tail is an I-cord done in crochet with a color change at the end if you want the tip of the tail to be 'painted'. I made my tail about 3inches long
I hope she doesnt mind me linking her video here she just explains it so much better than I could.
When I make an other Catigurumi I will make sure to take alot of pictures to add to this post.
Ifsomething is confusing or unclean let me know and I will do my best to make it easy to understand.
I ordered some new business cards to leave at Animeggroll where they sell some of my creations. I think I really like the card but I wont know till I see the actull cards in about 14 days. So I updated my site header to match it.
While working on the card, I realized I have not uploaded a gallery of stuff I have crochet so I think I will try to do that soon. Not sure how it will work, the image controls for the blog are bulky and hard to do much with placement.
Here is my Abnormal Unicorn, I was inspired to make this when I was commisioned to make a Funnie Bunni
Things needed to make this are:
White yarn, roughly 10 yards or less
Gold or Silver yarn, for Horn and hooves less then 2 yards
Blue/Purple/Red/Orange/Yellow/Green yarn scraps for the mane and tail less then a foot of each color
I used an F (3.75mm) hook for the body/head/feet
darning or yarn needled to sew horn and hooves to the body
15mm Safty eye's (or you can felt black felt on)
I am from the US so
I am using the US crochet terms the only things you need to know to make this pattern are, MR (magic Ring), SC (single crochet), INC (increase), and DEC
(decrease). Some other terms I may use rnd=round, st-stitch, yo-yarn over.
Even if you have
never crochet before this should be simple.
If you have never worked in the round before don’t be scared its easy!
MR-6 (in white yarn)
R1 inc -12
R2 sc inc -18
R3 sc 2 inc -24
R4 sc 3 inc -30
R5-9 sc all -30
R10 sc 3 dec -24
R11 sc 2 dec -18
R12 sc dec -12
R13 dec -6
Hooves 4X
MR 6 (in gold/silver) R1 sc 6 (color change to white at end of round) R2 sc 6 R3 sc 6 (leave a long tail to sew into body with)
Ears X2 -UPDATE 4/7/18-
chain 6, sl st into the 2nd st from the hook, sc, hdc 3, sc 2 into the last hdc turning and hdc into the same st again, hdc 2, sc, slst and finish off.
I have added a chart of this section to help with clarification. The red chain is the starting stitch, the blue slip stitch is the ending stitch.
Horn
MR 4, sc for 5 rows or for as long as you want the horn
Assembly
Add eyes, I placed mine between the 7-8 rows. Stuff and sew body shut. I didn't need to stuff my legs any more then just pushing the tails of my yarn and color changes into the legs, but if you want them firmer sew them half way onto the body and finish stuffing before you sew them the rest of the way. I sewed them into the rows 10 threw 12, my front lets set wide under the eyes, and my hind legs closer together for stability. I sewed the ears on about 5 st's back from the eyes and a row up, on the same row but in the middle of the eyes I added the horn. From here I did the mane, you can do it any way you want but this is how I did it, I used a size D hook and used it to pull two strands of a color at the same time threw a stitch starting with the row directly behind the horn. Make sure if you do it this way you always pull the yarn threw the same way so they all lay the same way. I went in from right to left (eyes facing me) and it made the mane lay to the right (when held eyes facing me). For the tail I added two strands of each color onto a separate strand of yarn. I did a hitch knot, folding the strands over the base strand and pulling the tails threw securing them. I did this for each color then tighten the base strand and knotting it into a loop that I then sewed onto the base of the body.
I wish I had made the tail longer, I pre cut all my strands for the mane and tail to 4 inch's (folded over so they are all 2inchs long) I think a longer tail would have been more appealing but it was just right for the mane.
As always if something isnt clear just let me know and I will do my best to explain and/or provide video/pictures.
This Bunnie was a commission from one of the guys who came to the gaming convention I have been at all weekend. (Fear the Con). I made it from a sketch he drew me, its basically a sphere, with long ears laid flat on its head 4 pointy feed and a ragged tail. Took me roughly 4 to 6 hours to crochet it all, and about 30-ish minutes to assemble in a manor that would best resemble the drawing. We opted to felt on eyes because I didnt have access to the right size safty eyes.
This has given me the idea to modify what I wrote as I worked and make a unicorn verson with a rainbow tail!!
I also worked on an other BaBomb for myself but before I could even finish it someone came up and asked to buy it.
This is for Katy Board and anyone else who wants to make a Penguin for a friend or themselves!
What I used to make the Penguin
pattern
Size E/4 (3.50mm)
crochet hookYou can use a bigger
hook it will make a bigger Penguin, depending on how big your hook is it
make leave gaps if you find that happening you should crochet with two
strands of yarn at the same time or go down a hook size.
A sheet of white
felt (or any color you want the belly and eye patch to be) you willl only
be using a 2 inch by 3 inch piece
Felting needle
(if you don’t have one you can always sew or glue the patch into place but
I love the way it looks felted)
Scissors
Stitch marker -
You can go fancy and use a store bought one or make a fancy one, I just
use contrasting scrap of yarn something I am sure will not rub off and
leave fiber behind.
Safty eyes-Safty eyes will lock in and are
impossible to remove with out bolt cutters or actually cutting into the
doll so it will make the toy safe for any age.
Small amount of
orange crochet thread or yarn (I used #10 crochet thread because I had a
few scraps left over from making toe straps for my baby niece last
summer.)
A needle (to
embroider the beak, and attach the wings and weave in loose yarn ends) I
have a few darning needles and a 'Big eye' that I used ((Big eye is a
beading needle that the whole center of the needle is the eye you pinch to
open it and it makes it easier to thread, plus the needle is flexible and
thin))
PVC pellets (if
you want some weight to help it stand straight)
I am from the US so
I am using the US crochet terms the only things you need to know to make this
penguin are, MR (magic Ring), SC (single crochet), INC (increase), and DEC
(decrease). Some other terms I may use rnd=round, st-stitch, yo-yarn over.
Even if you have
never crochet before this should be simple.
If you have never worked in the round before don’t be scared its easy!
For those of you who
don’t know how to do a magic ring (MR) its pretty easy and its my preferred
method of starting most amigurumi.
Start by taking hold of the end of your yarn in your non
dominate hand ( that would be my left) and drape it over your hand with the
tail end on your palm and wrap the working end (connected to your ball) loosly
around your first two fingers.
Then your going to
take your hook and slip it under both loops, (in the pictures I am using a
larger hook the needed for the pattern so you can see what I am doing clearly)
then take the working yarn and wrap it from under the hook over and pull that
loop under both loops of the ring. Then
you will yarn over and pull threw the loop on the hook. (basicaly chaining one
stitch) Slip under the loops of the MR yarn over, pull threw, you should have
two loops on the hook now (in the video I might call the loops hooks because I
am loopy like that) yarn over and pull threw both loops and that is your first
SC in the round. Now just keep slipping
under YO pull threw YO pull threw both loops, repeat till you have the number
of st's needed for your mr, so if I say
MR-8 you would need to end up with 8 sc.
I like to loosen up the working loop and slip a finger or three threw it
before closing up my MR to make sure I don’t loose a stich. Now take the tail end of the yarn and gently
pull to close the ring!!
Now onto the
pattern.
MR-8
Rnd 1 INC ALL
-16 ((Round 1, increase in each stitch,
ending up with 16 st's
Rnd 2 sc, inc -
24 ((Round 2, *sc in stitch, increase in
the next repeat from * so its sc, inc, sc, inc, sc inc…)
Rnd 3 thru 8 sc all
-24 ((Rounds 3 to 8 sc in each st, no
increasing or decreasing you will have 24 sc st in each round)
Rnd 9 sc, dec
-16 ((Round 9 *single crochet one st,
then decrease* repeat from * ending with
16 st's)
Rnd 10 sc all-16
Rnd 11 sc, inc -24
Rnd 12 thru 13 sc
all -24
I took the time here
to attach my felt and eye's (I didn’t felt it on I just put the eyes threw the
felt and let them hold it on). After
securing the eyes nice and tight I stuffed the head portion to my liking.
I cut the felt a
little larger then I wanted the finished part to be because when you felt you
will loose about a CM of space all around. If your gluing or sewing make it the
size you want it to be.
I folded my 2x3
piece of felt in half, starting with the head I cut as if I was going to cut
out a heart but stop half way threw turn and cut down like a tear drop. I used my crochet hook to loosen up the fibers of the felt to
put my eyes threw, you can make small slits with scissors if you prefer. Slide the eyes threw the felt and into the
crochet, making sure you put their backs on tightly.
Rnd14 sc, sc, inc
-32
Rnd 15 thru 18 sc
all -32
Rnd 19 sc, sc, dec
-24
Rnd 20 sc, dec -16
Rnd 21 dec all -8
Cut off and leave
4-6 inch tail. Stuff the rest of the
body adding in about 2 Tablespoons of pellets, and weave the tail threw the st and pull them shut, using
the needle weave and tie off the end. I
like to weave tie and weave again and tie off a second time then weave the needle threw a large part of the body and
snip off the extra so you hide the tail
inside.
After you stuff,
either glue, sew, or felt the mask/belly patch. I started at the top with the eyes and
worked my way down trying to keep both sides even and flat, when you get to the
bottom you will have to pinch the felt in to spots to get the rounded look if you didn’t cut it
just right (which I didn’t)
Now make two of the
fallowing wing's
MR-6
Rnd 1 sc, inc -9
Rnd 2-6 sc all -9
Lay the wing flat
and using the needle weave or stitch the wing closed then stitch it onto the body, I choose to
stich it into round 11 of the body, only stitching onlge the closed edge so the
wings can be flapped.
Then I finished it
off with my big eye needle and orange crochet threat I slipped threw from the
front to the back of the felt and make to the front and loosely make a
knot then went back in and out in the
same spot 3 more times, then lower and smaller three times till I got a small
triangle beak. I slid the needle threw the front and weaved it
back and forth before pull it threw and hiding the tail inside by pushing the
needle threw to the back of the head.
If something isnt clear or you need help with a step leave a comment and I will do my best to help you out with video or picture walkthroughs.
I started working on this cutie after watching a marathon of Penguin Drum with the people over at Animeggroll. Its one confusing anime, but I love the penguins they are so cute and expressive.
I enjoy'd working out a pattern for this one.
If there is enough interest in it I will type up the pattern, right now its all in my short hand notes.
I can safely say any beginner to crochet could easily make this!
So for a while i have had this idea in my head for a snow owl. Today
I finaly took a break from working on my mohair shrug and made the
owl.
I
wanted to give it the puffed up plumage they ge t on the chest but I
was tripping over stitches nothing seemed to work. That is till I
perfected doing the bullion stitch, well I didn't perfect it per-say but
I was able to get 5 near perfect bouillon stitches out after a lot of
failures. I am not 100% happy with the surface crochet I did to make
the feathered ear tuffs, but I am not sure what I could have done
differently. I opted out of adding a beak because the black and orange
yarns I have just didn't look right. I jotted down notes as I was
making it so if people are intrested I can write out a pattern for this
little guy.
I also have an other owl project bouncing
around in my head. Helen Rodel made some gorgeous masks and hoods in
2010 as a one off for a fashion show, and I am going to try and figure
out a pattern to make a owl hood, I have wanted one since i first laid
eyes on it but as she only made the ones for the run way and never
published a pattern I will have to work it out from photos and a lot of
hard crochet. I just need the motivation, and well a stash of yarn
before I can start working out a pattern for a owl hood inspired by owls
and Helen Rodels work. Since I am the queen of procrastination dont expect it from me any time soon, I probly wont start on it till I find the right fiberus yarn to inspire me. Maybe a cream or off white shade of alpaca.....






 I am from the US so
I am using the US crochet terms the only things you need to know to make this pattern are, MR (magic Ring), SC (single crochet), INC (increase), and DEC
(decrease). Some other terms I may use rnd=round, st-stitch, yo-yarn over.
I am from the US so
I am using the US crochet terms the only things you need to know to make this pattern are, MR (magic Ring), SC (single crochet), INC (increase), and DEC
(decrease). Some other terms I may use rnd=round, st-stitch, yo-yarn over. MR-6 (in white yarn)
 R3 sc 6 (leave a long tail to sew into body with)
 I sewed the ears on about 5 st's back from the eyes and a row up, on the same row but in the middle of the eyes I added the horn. From here I did the mane, you can do it any way you want but this is how I did it, I used a size D hook and used it to pull two strands of a color at the same time threw a stitch starting with the row directly behind the horn. Make sure if you do it this way you always pull the yarn threw the same way so they all lay the same way. I went in from right to left (eyes facing me) and it made the mane lay to the right (when held eyes facing me).


