Thank you Kawa Kon!
Hosting my first pannel at Kawa Kon was a blast. I was up against a few really compelling other pannels so I want to give a shout out to the people who stuck with me through technical issues and made my first pannel fun.
For those of you who where un able to come to the Kon, I gave away some cute mini octos, cthulhu, chibi dragon, and 2 pokeball DIY kits. In the time of the pannel, one of the people who voluntered and got a kit to work on during the pannel was able to start and finish in the 1 1/2 hour and she had only been crocheting for a few months.
Pokeball- Red/Black/White yarn (small amounts) size G crochet hook, a yarn/darning needle, and stuffing where all included in the kit but I had forgoten to print the pattern so I am posting it here!
With Red-
R1- Mr 6
R2- Increase in all
R3- Increase, sc (repeat around)
R4- Inc, sc 2 (repeat around)
R5- Inc, sc 3 (repeat around)
R6-7- sc all
R8-9- Switch to black- SC all
R10-11- Switch to white- SC all
R12- Dec, sc 3 (repeat around)
R13- Dec, sc 2 (repeat around)
R14- Dec all
FO-- leave 6 inch or longer tail, stuff ball, and using the darning/yarn needle and weave threw the front loop of each stitch in that last row, giving it a tug when your done to chinch the opening closed. You can make a small knot to secure the yarn then poke the needle all the way through the ball and out the other side and just snip the tail so it hides itself back into the finished ball.
To make the button on the front of a ball-
R1- With white, MR 6
R2- With Black, increase all
FO leaving a long tail to sew to the ball, when worked in a spiral I like to place it right over the color change hiding the little jump in colors.
I have a few things I want to work on, but when I get the time I will whip up some more mini octos and post the pattern for them.

My little space for sharing what I am crocheting/knitting/crafting now.
Showing posts with label pattern. Show all posts
Showing posts with label pattern. Show all posts
Sunday, March 8, 2015

Sunday, March 1, 2015
Want your own Faux Fox? [Pattern]
 Faux Fox Stole my Heart.
I used a bulky yarn for this, two brands because neither brand had all the colors I wanted.Orange-Lion Brand Thick and Quick Wool Ease (3 1/2 skeins)
Black & White (technically its silver >.>)- Loops and Threads Cozy Wool ( less then 1/4 a skein each)
Worked up with a size K hook.
I will be writing in short hand so -o- means do this in Orange, -b- black, -w- white.
My finished scarf (just the body not including the tail or head) is 6ft, you can make yours longer or shorter by adjusting the amount of rows you work for this part. I sugest for a child do 3-4ft, for a teen 4-5, adult 5-6, for crazy fox scarf 6+.
This pattern is a quick clean up of my notes I took when making the scarf so please let me know if something is off so I can fix it.
I just want to say a quick thanks to my handsome model for showing off the scarf for everyone to see, he opted for a bit of anonymity by hiding his face.
Head-
R1- -b- MR sc 6R2- -w- INC all
R3- -w- sc 2, -o- inc 2, -w- sc 3
R4- -w- inc, sc, -o- sc, inc 2, sc, -w- sc, inc 2
R5- -w- inc, sc, inc, -o- sc 6, -w- inc, sc, inc 3
R6- -w- sc 2, inc, sc 2, -o- sc 2, inc 2, sc 2, -w- sc 2, inc, sc 6
R7- sc all, white in white, orange in orange
R8- -w- sc 4, -o- sc 12 -w- sc remaining stitchs
R9- -w- sc 3, -o- sc 14, -w- sc remaining
R10-16- -o- sc all
Ears- make 4 (two in white, two in orange)
I suggest making the 2 white first so you can easily assemble them with the orange and not have to cut the yarn then sew the pieces together later.R1- MR sc 2
R2- SC all
R3- Inc all
R4- SC all
R5- SC all
Holding the white aginst the orange, sc around, putting 2 sc into the bottom corners and 3 into the top.
Eyes- Make 2
I made my eyes by unplying a length of the black yarn, its equivalent to a thin WW. You can use buttons or safety eyes instead I didnt have any in a size that would work well for me so I just crocheted mine.MR DC 12, sew onto face, I used some of the scrap white unply'd it and added in the lense flair affect you see on the eyes.
I also take this time to place the ears and sew them on to the head as well.
Legs- Make 4
R1- --b--MR DC 4 --DO NOT JOIN IN ROUND-- this is worked flat, just tighten up the MR and weave the tail into the first row.R2-3--b- dc all
R4- -b- dc, dec, dc
R5-10- -b-dc all
R 11-16- -o- dc all
Tail-
R1- MR DC 6 -w-R2- INC, dc 2, around-w-
R3-Inc, dc 3 -w-
R4- Inc 2, dc 3 -w-
R5- Inc, dc 2, inc, dc 3 (repeat around)
R6- Inc 2, dc 2, inc 2, dc 3 (repeat around)
R7-8- dc all -w-
R9-19- dc all -o- (this should leave you with about a foot and a half of tail worked, if you want a shorter or longer tail work a few more or less rows)
R20- Dc 4, dec -o- (you may more may not wind up with 3 or 4 dc at the end and no dec that is ok)
R21- DC all -o-
R22- DC 3, dec -o-
R23- DC all
R24- Dc 2, dec -o-
R25- SC -o-
FO with long tail for sewing into the end of the scarf.
Body - Make this as long or short as you want, I worked my body to 6ft so on me it can be wrapped around 2 or 3 times with both tail and head still sitting in front.
I also assemble as I worked, when I start the body of my scarf I start it by picking up the stitches from the head (working threw both layers), and the front legs. You do not have to do it this way but it elimitates having to sew on both head and legs.R1- Work 12 DC along the seam of the head peice (working through the front and back at the same time, as well as the legs on the sides-- IE first 3 stitchs are worked threw 3 layers leg/fhead/bhead; then 6st through just the f/b of the head, then the last 3st are worked threw 3 layers of leg, f/b head)
--If this is to complicated you can chain 14, turn and work 12 DC across the chain (12 ch + 2 ch for turn; turning chain DOES NOT COUNT AS A ST)
R2--till lengh you like-- Chain 2, DC all
I end with a row of SC for sewing my tail and legs into so it wont stretch out and leave big gappy holes on DC. For extra security I like to sew the legs on first then the tail, and use the tails yarn to go over both of the leg seams as well.
Wednesday, January 28, 2015
Chinese Dragon PDF [Pattern]
It is finally finished so here for your crocheting enjoyment!!

Click here for Chinese Dragon PDF
I would rank this as between Easy and Medium. Mostly because of the wiring work put into it to pose and have him standing unassisted.
I do think if/when I make an other I will move the legs a bit farther back by 4 to 6 rows.
I used Red Heart Soft for the hair because I like the shine, but I recomend in the pattern to use normal RHSS I realized to late that the shine in the soft makes the hair next to impossible to style unlike a normal acrylic or wool/cotton would.
Wednesday, January 21, 2015
Feeling Sheepy [Pattern]

I finally finished it! So here you go a PDF Download of the Feeling Sheepy pattern.
To make one like mine you will need two yarns and 2 hooks. Bernat Blanket yarn, and Red Heart WW. If you don't have bernat, and don't want to buy a ball just to make this tiny guy you can crochet holding 3 strands of any ww yarn together as a replacement but you wont get the same 'fluffy' look.
Tuesday, January 20, 2015
CD- Wiring the legs and toes


 What I did was take 2 pieces of wire about 12 inches long. I bent the first piece in half and slid it all the way threw the body where I wanted the legs to to, then slipped the other piece threw the bend and interlocked them by bending it. Think of it like to U shapes with one dangling from the bottom of the other. I used the piece that was going threw the body to pull the other leg wire inside the body so the join is hidden in the middle. I had been trying to catch the spine wire at first to try and have the legs connected joined over it but I was not able to pin it down the way I was putting the wiring though.
 I slid the legs onto the wire after I was sure the leg wires where locked together and wouldn't fall out. I took this time to sew the top of the legs into the body.
 At the toes, I took the wire, bending one side to the front middle toe and the other to the back longer toe. I bent it back onto itself snipping it just short of the leg section, I found I had about 1 1/2 inch worth of waste wire. I then used my tail end of yarn to pick up the sides of the toe and sew over the wire with a whip stitch closing the toe up over the wire. I made sure to sew up the two front toes in the same manor, and criss crossed over the bottom of the leg to close up the small gap.
I did not stuff any part of the leg or toes although in hindsight I could have stuffed the top of the leg with a grape sized amount of stuffing and just rolled the leg a bit to get the stuffing to evenly distribute through it.
I just need to make an other set of legs for the back, then I will get started on all the small things and adding the hair along the spine.
Sunday, January 18, 2015
The results are in...

First off as I was un pinning the dragon to take him off the board I realized I had made a mistake.
I blocked him perfectly, there is a nice straight line. It just goes down his belly. I accidentally blocked him upside down, and yes there is a top and a bottom, the eyes are set 2 stitches above the 1/2 way mark so they are visibly on the top section so I couldn't just flip the whole project.
The blocking still worked well and like I said the belly has a nice straight line, but because I could not see exactly where I was pinning though on the other side the top is not as straight. So if I do make an other dragon, or decide some of my other amigurumi could do with some blocking I know now that its possible to block 3Dforms, and easy to do. Just need to triple check, is it right side up, and is it straight before steaming.
I did manage to run a bit 17 gauge rustproof wire through him from nose to tail. This is wire I had on hand from when I was trying to make a chain mail dice bag for my husband (someone else made and sent him one before I finished so I just set it all aside) I know it came from our local hardware store, its electric fence wire, I went with it because its specifically says its rustproof, and soft enough I do not need anything special to manipulate it just some needle nose pliers that have a wire cutter built in. I was able to make a small loop with the tip of the wire and tie off a slip knot onto it with some scrap yarn, I then threaded threw my darning needle. I worked the needle threw the body (popping out every 3-4 inches and working back into the exact spot I came out of) using the needle and scrap yarn to pull and guide the wire all the way through.
I also got my base line down for adding in his spin hair. I took about a yard and a half of the hair color (blue) and used my yarn needle to embroider a chain stitch all the way down the spine. You can see in the photos it is not 100% straight but its dang close. Once I get all the strands of hair connected and brushed you will not see the spine and it will appear straight. I will be taking 4 inch strands and using a larks knot to attach them to the chain stitch going down one side of the spine and back up the other side so the mane will look nice and full, also so the hair line will look the same on both sides as apposed to if I just held 2 strands and went threw both loops of the chain the sides would look visibly different.
 The cats both seemed to think he was a toy meant just for them to attack while I was working on him so there was almost no way to work with him or even get a photo with one one of the two kitties taking notice and literally jumping in on the photo opp. Dayton in the front, Connie in the back if you can spot her, they thought it was a game of who could attack first when I was running the wire through (it was waving all over the place) not to mention I did have about 1 foot of yarn dangling off the tail end from where I had finished embroidering so that was probably my first kittie attracting mistake.
Saturday, January 17, 2015
Chinese Dragon WIP (and steam blocking acrylic)


I am currently working on making a white and blue Chinese style Dragon.
I am keeping some rough notes, so I will have a bare bones pattern to share at the end of it all.
For those of you thinking it looks like a white snake and not at all like a dragon, well yes it doesnt look like a European Dragon with a stocky body and huge wings. Chinese dragons do not have wings at all as its believed they have mystical power they use to fly, they are said to be a long serpentine body with 4 legs, and a long ridge or hair line from head all the way to the tail.
I had seriously been thinking of wiring this guy as I worked him up but that did not happen. I might wind up trying to slide some wire in him now that the base of the body is finished.
I had to pin and steam block him, as all crocheters know when you work in the round you get a bit of twisting as you work. Well with a small diameter tube you tend to get a lot of twist so much so it twisted all the way around, and that would make it more work for me when I try to run a Ruff down the spine.
So my awsome husband ran down to the basement and got my blocking mat so I could 'block' my dragon. The first1/3 of the dragon was pinned down fairly easily it had almost no twist, it was when I got to the last 1/3 that the twist was really bad. I had to put 12 T-pins into the end tail to get my rows to line up as close to perfect as I could.
From here I went back over double checking the line of the spine was straight, which is good because I had it twisting off still so I was able to fix it fairly painlessly. I then used my garment/upholstery steamer I got on sale (only $19!!) and slowly steamed it. Holding the steam head about one inch from the work for15 to 20 seconds per section with a 3 1/2 inch head over 2-3 ft of dragon before moving on. I went over the body till the 10oz of water I had put in the machine was used up (give or take an ounce). I know I got at the least 4 passes of the body fully with some focused steaming on the tail end where the worst of the twisting occurred. You can get the same blocking results with a iron that has a steamer setting I would just recommend you hold it farther away as the iron's heat itself will affect the yarn (2-4 inches).
I have taken out most of the T-pins but the head and last tail pin there has been no attempt to twist back up but I will be leaving it pinned over night so that it can dry up as the steam did leave it a bit damp.
I also got some time to paint up some eyes so he will be sporting custom painted eyes, I was going for a silver sky blue, I will try to get a better photo of the head later.
On Sunday I will hopefully know if I will be hosting a 30-60 minute pannel at a local anime/geek convention KawaCon. Its been up in the air for a while now when I was ask I said yes right away they just have to work out details on their end, it on hinges on if they have an open room and time slot.
Also I will be out at Animeggroll Sunday (1/18/15) helping people make/finish some Octos from 12-2!!
Saturday, January 3, 2015
What does the Fox say?

I took inspiration from 'The Flint Fox Cowl' in making this for my niece.
I didn't like TFFC pattern, it had an odd texture and the sizing was way off only the smallest size would have come out right, and her sizing for everything else is very vague, and when I started the toddler size the hood section came out big enough for me to wear it so I scraped it and started over making it up as I went. (Her gauge said with bulky yarn ((I am using the same yarn she did)) and a L hook 2 1/2 stitchs = inch and my gauge matched that so it wasn't a gauge tension issue) Also her yardage was off by almost 2/3 a skein.
I worked from the bottom up. Here is what I did for a toddler/child size--
I used up 3 full skeins of bulky orange (318 yd), just under a full skein of dark gray (100 yd), and a very small amount of silver for the front of the ears (less then 10 yds)
Dark Gray, Chain 60 (+2 to turn)-hdc across (60 st do not count turning chain as a stitch)
Alternating Front Post HDC, Back Post HDC for 2 rounds (=3 finished rounds)
Then I switched to orange, and hdc 7 rounds. (10 finished rounds)
Then I worked a shoulder section decrease by *hdc 5, dec* repeating around (11 finished rounds)
I did an other rounds of shoulder shaping *hdc 4, dec* around. (12 finished rounds)
Here I stopped working in rounds and worked 12 rows back and forth evenly in HDC.
I flipped the peice inside out and slst the top of the flat pannels together to form the hood, taking extra care at the end, I did a decrease twice so as not to have a sharp point stitcking out when I flipped it back right side out.
Using the dark gray I worked a round of HDC around the opening of the face, chaining 4 (+2 TC) and worked back across (4 hdc into the chain ) the face section. I worked this back and forth for 4 rows. To get the collar to lay right I whip stitched the edge of the start of the collar and the bottom of the chain 4 together to make a point right in the middle and pinned it in place by sewing a botton over it.
The ears are 2 peices that are SC together, you just hold them together and work threw both pieces as if it was one.
Mr- sc 2, close the ring. ch 1 turn, sc 2, ch 1 turn increase across (4 st), Ch 1 turn sc across, ch 1 turn sc inc inc sc (6), ch 1 turn sc all, ch 1 turn inc sc4 inc (8), ch 1 turn sc all (work this for 3 rows)
Make two in dark gray and two in white/silver then SC from the bottom up putting 2 stitchs into the point do not work across the bottom of the ear as you will be sewing it shut as you stitch it onto the hood.
I stitched my ears into place 2 rows from the join of the top of the hood, right where the folded brim/collar of dark gray end's
You can stitch the brim down to hold the fold or just leave it as is so it can be flipped out on particularly windy/rainy days.
When I started this I though I might make one for me, but I bought the yarn based on her yardage and I know I wont have enough so I might make a faux fox scarf instead.

Bonus! Got to hang out with my niece and managed to get a shot of her in the hood! Little stinker knew what we where up to so getting a good shot was not easy.
Tuesday, December 16, 2014
Gloves! (sorata a pattern?)
 They still need buttons for closure but other wise they are finished.
 Its so hard to get good shots of gloves when you dont have a 3rd or 4th arm to take the photo with, add that to all the murky weather these are the best photos I was able to do.
I worked them in row's not rounds so I could get my chroma to do those vertical stripes.
This was the frist time I attempted this style glove if I ever make an other pair there are a few ajustments I would need to add in as the area between thumb and pointer finger is a bit tight even with the extra gusset space I worked in. I did a simple trim of arches (on row of chain 3 sk 2 sc, fallowed by a row of 4sc in chain space slst in sc) I did the trim this way so I could use it on the side of the glove as button holes as well as being a decorative trim. The trim runs the length of the top section of the glove around the cuff, when you get to the palm section all I did was a simple row of SC both rows to give me a solid space to sew buttons on.

I used 1 ball of chroma in ww, with about 30 yd or less light gray DK weight with a size D hook. I find ww chroma not to be the typical worster weight size it runs thinner which is why I paired it with a DK which seemed to be just slightly thicker.
Next pair these are the changes I need to make--
- Additional row between thumb and fingers on both palm and top.
- While the sc in bl to fl seam looks interesting I would need to sew pieces together or only work the bl/fl sc seam till it hits the thumb then sew thumb threw fingers together for less bulk and resume bl/fl sc join at end of pinky till cuff.
- Palm section from pointer finger through thumb area needs additional row or two.
Top of hands- make 2
I chained the length to get from the tip of my them till 2 inches below my wrist (for me that was 40 chains)+1 to turn, I sc 3 rows, then working back up I stopped where the lenth of my thumb was left unworked (12 unworked~~) and chained the length between my thumb and tip of my pointer finger.----if I where to make these again I would adjust this area as its tight on the finished glove-- work the pointer finger 3 rows, on the return I leave the length of my pointer finger unworked and chain the length of my middle finger ect working 3 rows for each finger.
I worked a base round in grey from the edge of the cuff up and around sc in every stitch 3 across the tops of fingers and between.
Palm section - make 2
Starting on the pinky side I just revers that I did for the top side all the way till finishing the middle finger. For the pointer finger I started it as normal sc up the chaining- but on the way down I stopped at 20 st's and chained the length for my thumb (12) and worked these two fingers for 3 rows (technically 4 for the pointer).
I did a trim starting on the pinky side at the cuff working up and around, 3 st in top of every finger, looping around the tip of the thumb worked back up the chain and down again. On the pinky side from cuff up I worked 32, then 16, then 36 (cut the yarn and worked from cuff up each time), thumb side cuff up sc 40, 16, all but last 6 stitchs; to accommodate my wide wrists. The cuff side is the section from the cuff (last long row of the middle finger/pointer finger) up around the chain side to the tip of the thumb sort of like your working a candy cane shape.
To join flip two sections to be the left glove, and starting from the thumb cuff up I worked in the back loops of one peice and the front loops of the other and sc'd evenly around. I find now that the gloves are finished its too bulky in the fingers so I recomend doing the sc till the base of the thumb then using a yarn needle and sew the length of all the fingers till the end of your pinky finger the pick back up with the sc bl/fl leaving 2inches of the cuff unworked 9was 16 stitchs for me.
Finishing cuff, starting at the join, sc down then across bottom of cuff and back up the other side finishing with a sc into the join. Repeated this for a second pass (cuff was just a bit tight which is why I did an other row). At join I ch 1 and turned no longer working in a round, along the 'top' work *chain 3, sk 2, sc* all the way around till you get to the palm section just sc straight up. Chain one and sc aback around sc on palm section, work 4 sc into chain sections with slst between into the sc from before.
I know this isnt a realy flushed out pattern but my hands are small and wide so I think its more of a blue print you can adjust it easily by knowing the size hands you are working it for.
If only I had a outline of my neice's hand I would make her a pair of these to match her hat she is getting for christmas.
Saturday, November 8, 2014
Come see me today out at Animeggroll!!

The address is:
9254 Watson Rd, 63126
314-543-3009
Its in the shopping center with Aldi's and the Red Cross.
Wednesday, September 10, 2014
One down... I forget how many otheres to go.... (Pattern)

Blue Ribbed slippers.
Christmas gift for someone. I may wind up having to remake one of them as they are not quite the same size. I did everything exactly the same but as I was working the second one my tension was apparently tighter and its just a fraction smaller >.< they are made to stretch so this size can fit 8-10 (woman's) ((about 10 inches with stretch)).I am debating on if I should add a strap, or something else to the slipper. I dont want them to look so plain the giftee thinks I didnt want to spend the time on them, but I am afraid of making them to 'busy' looking as I love the way the rib texture looks. They are meant to be worn around the house and not on outings but could easily be adapted with some felt or leather soles.
Slippers-
Make 2 (or one if you only have need -.o of one) depending on your yarn (mine was some where between ww and chunky) you will use a different hook, different hook will also mean a different size so keep that in mind. Its easy to adapt this pattern to smaller/larger sizes while working the sole. These where made for someone with wide feet so if your making them for a normal or slim foot only do one increase section in the sole.Starting with the sole- work 2 so they come out the same size o.-
r1-Ch 8, In 2nd chain from hook hdc, hdc across (6) --This will be the heel
r2/8-ch 2 turn and Hdc all (6) --- (if your making them smaller only do 4 to 6 rows)
r9-Hdc inc in first stich, hdc to last, hdc inc in last st (8)
r10- Hdc all (8)
r11- Hdc inc in first st, hdc across, hdc inc in last stitch (10) --for normal/slim feet just HDC all and do not increase.
r12/19-Hdc all (10) --If your making them smaller again only do 4 or 6 rows
r20-Hdc dec in first st, hdc across till 2nd to ast st, hdc dec last st (8) --Toe shaping- end of sole
Cut tail and FO weave in ends or you can crochet over them when you work the body round
Body of the slipper
(Front Post Half Double Crochet=fphdc Back Post Half Double Crochet=bphdc)r21-Work a standing HDC into the 3rd stitch (middle of the heel) of the heel ((if you dont know how to do a standing HDC you can just slst and chain 2 it will count as your first hdc)). Hdc all the way around the sole---Mine broke down to 6 st along the heel, 8 at the toe, and 23 along both sides equaling 60 hdc (or 59 hdc and your starting chain 3)
r22- chain 2 (counts as first BPhdc here and threw out) world alternating Fphdc and bphdc around, slip stitching into the first fphdc at the end (not the chain)
r23- chain 2, repeat the fp/bphdc pattern by Fphdc around the fphdc of previous row and same for bphdc.
r24- Start off by grabbing some stitch markers, we need to mark off the toe section. In the middle of the toe section count out 7 FPHDC in both directions and mark it so you now have 28 stitches of the toe section marked off. Now fallow the Fp/Bp pattern till the marker, across the toe ONLY WORK the fphdc skipping all the bphdc till the second marker. Then go back to the fp/bphdc in fp/bphdc till end. Slst into first fphdc.
r25- Fp/Bp in Fp/Bp till toe section. Fphdc dec twice, fphdc 6, fphdc dec twice. Fp/Bp in Fp/Bp till end
r26-Fp/Bp in Fp/Bp till toe section marker. Fphdc 2, fphdc the next 3 together twice, fphdc 2, then go back to the Fp/Bp in Fp/Bp pattern.
r27-Finishing trim row, I just did a simple slst around and FO
Tuesday, July 29, 2014
Ta-done! Water Dragon
 Instead of horns that I normally do on other dragons I opted to do seaweed tendrils. I also added smaller patches of seaweed to the arms as you can see in the back image, but I wound up removing them they where not fuzzing up and looking light and airy like the sections on the head. Due to it being a water dragon I went with making a longer finned tail and no hind legs.
I did an indoor shoot today because I realize the last few blue items I photographed out on my bench just got sapped of color by the silvering wood and I wanted the colors to show clearly.
Yes, there are no wings. I thought about it in a practical manner and if it was swimming in the water the wings would cause to much drag and wouldn't be practical. Also it might make it too busy looking with all the details

Monday, July 28, 2014
WIP Water Dragon

I unspun some navy, purple, and light blue and used the the singles held with the working yarn to get this effect, light to dark as I worked own.
I got a close up of the eyes I painted, they where clear cat eyes 7mm and now they are lavender dragon eyes. I wish I had been able to get 8mm eyes but they didnt have them in that size still I think in person these look realy stunning.
I need to take a day and paint up 20+ set's of eyes as my stock of hand painted is slowly being used up.
I plan on adding a little surprise element to this guy but not sure how it will look so I have to play with placement of it.

Tuesday, June 3, 2014
Newest Chibi Dragon to join the bunch...

The colors just made me think of Hershey's kisses so thats where she got her name.
I have decided to hold off on working on puting together a pattern till after the convention I am going to sell at so I have more time to work on things to sell.
This does not mean I wont start on it, but dont expect it soon.
Any suggestions for color combos anyone would like to see the pattern dragon worked up in? Think of what will photograph well, so white and black are both out the window. I was thinking of digging threw my stash to see what I have, I know I have left over colors from my rainbow granny that are more then enough to make a dragon, and many diffrent shades of those colors.
Saturday, May 31, 2014
Fear the Con 7 June 13-14 (St Louis gamers convention)
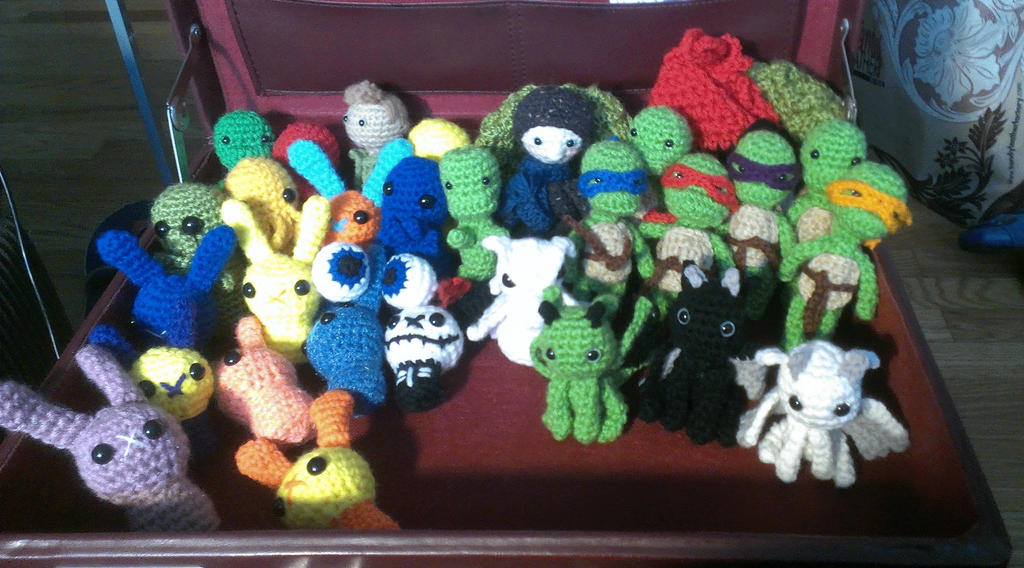
This is, a winter
chibi, a Dean chibi, a dinosaur, a owl, 2 blue eyes (cats love these), 3
generic turtles (so they can be customize later), one full set of TMNT
will be sold as a set (unless it gets to mid 2nd and no interest is
shown then I will brake them up), 3 chibi dragons, 5 cthulhu in assorted
colors, 9 bunnies in assorted colors, 2 dragon scale dice bags, and a
pokeball dice bag.
I am trying to decide if I should make more TMNT, or work on more dragons, or not bother with crochet and get to work on creating the Chibi Dragon Pattern.
Monday, May 19, 2014
Chibi Turtle Pattern *FREE PDF*
 | |
| PDF Preview |
Chibi Turtle PDF
You can now download a copy of my Chibi Turtle Pattern. I have not gotten feedback yet from my pattern testing pool so if you catch a mistake please let me know.
Its not as detailed as my moonkin pattern but it should be easy enough to fallow, if you need any help, if something is unclear or you just thing a step sounds wrong contact me and I am more then willing to help/fix/explain.
Sunday, April 13, 2014
Aloha April matching sham! ~Pattern~
 So I decided I didnt want to match the pillows exactly I wanted the second sham to look like its part of the same 'set'.
I supersized the motif, pattern ajustments as fallows--
Working with a double strand (holding 2 strans together) and a large hook (I used a P)
Ch 8 slst into ring
sc 22 into ring
ch1 sc 2 into ring, ch 9 slst into top of sc, sc 4 ch 9 slst, sc 4 ch 9 slst, sc 4 ch 9 slst, sc 4 ch 9 slst, sc 4 ch 9 slst, sc slst to firt sc (should have 6 loops)
Then work the fallowing over the chain 9 ~~sc 2, hdc 2, dc 4, trb 4 ch 3 slst, trb 3,dc 4, hdc 2, sc 2, slst into the middle 2 st between chain 9's ~~and repeat from ~~
For the corner motif ajustments--
Ch 6 slst join in the round.
SC 12 around the chain slst to join
SC 2, chain 7 slst into top of stitch, sc 4 ch 7 slst into top of stitch, sc 4 ch 7 slst into top of stitch, sc 4 ch 7 slst into top of stitch,sc 4 ch 7 slst into top of stitch, sc 2 slst to join. (Should leave you with 5 chain loops)
Work over all the chain loops-
Sc 2, hdc 2, dc 2, trb 3 ch 3 (this chain will be your join stitch so when you are joining to an other motif ch 1 slst into motif ch 1 instead) slst into top of stitch, trb, 2 dc, 2 hdc, 2sc
I now have a matching set of spring/summer pillow sham's!
I cant wait for the voting process over on r/crochet to start, as there are so many other people in the contest with great projects to go up against.
Wednesday, April 2, 2014
Aloha April Finished -Pattern-

Aloha April Contest Entry
This is the project I have been working on to enter in a contest being held over at r/crochet.I wanted to be able to take the sham off with out having to destry it so it can be washed, and when fall comes I can pack it away and maybe make a more fall themed sham. I just tie off the top of the motif to the top of the motif on the other side with a yard of yarn folded over to make those little bows.
This also goes to show how lighting can realy change a picture. It is over cast outside and raining off an on but I was able to get that bottom shot off. Inside I took the top picture with 2 lights on (one behind and one in front) with what little natural light I could get from the window. Funny thing is the indoor photo has the closest to true yarn color to the actual color then the outdoor photo and normally its the opposite, how ever the pillow's orange color is truer to the outdoor shot.
This is the pattern I originally posted for the flower motif--
 1-ROW Ch 8, slst 1 in first ch.
2-ROW Ch 1, sc 16 into the loop.
3-ROW Ch 1, sc 2 over second and first rows (into the loop), ch 9 picot (ch 9, ss in first ch), sc 4 over second and first rows (into the loop), ch 9 picot (ch 9, ss in first ch), repeat from to 4 more times, sc 2 into the loop, ss 1 in first sc in this row.
4-ROW *ln next ch 9 picot: sc 2, hdc 2, dc 2, tr 3, ch 3 picot, tr 2, dc 2, hdc 2, sc 2: skip 1 sc in 3rd row (loop), ss 1 in next sc', repeat from * to * 5 more times (except make last ss in the first sc of this row).
I wound up only needing 18 motifs (3 rows of 6 motifs) to fit my pillow.
To connect as you work (recomended) for the first row, work one motif, then work the 2nd motife but on peddle 2, when you make your picot instead of ch 3 work -ch 1, slst into picot on 6th peddle of previous motif, ch 1- peddle 3 will connect to the previous motifs peddle 5. The 3rd-5th will all be worked the same. 6th motif you will be using to close the ring, work 1st peddle, connect the next two as previous with 2-5, work 4th peddle (no connecting), now in the 5th peddle work its picot into the 3rd picot from the 1st motif, 6th peddle into the picot of the 2nd peddle of the 1st motif.
For the second row, you will be working 2 peddles, then join the next into the 4th peddle from previous row (just pick a spot to start), then working counter clockwise connect your next peddle into the joint where peddles 5 and 3 joined. work next peddle into 4th peddle of that 2nd motif (going clock wise), work last peddle. Repeat this for the next motif (add the next motif to the right of previous), but the last peddle will be worked into the 5th peddle of previous motif (the one to the left). For the last motife of the row work one peddle, then connect to the FIRST motif of the row first -- 2nd peddle into FM's 3rd, 3rd, into FM 2nd/4th join (going counter clock wise) and so on.
I repeated the second rows join method for my third row then just tied off the tops of each motif to the ones on the other side.
I found it helped for me to think of one point as the top (1st peddle) and bottom (4th peddle) when connecting,
Saturday, March 15, 2014
Horned Owl (aka Moonkin) Pattern


Horned Owl aka Moonkin
I was asked by someone if I could help them find a Moonkin from World of Warcraft crochet pattern. I had no luck with that so I offered my time to write one out.I provide a lot of patterns for free but this pattern I spent a lot of time working on testing and rewriting and converting into PDF format with a lot of images. So I am going to offer it, but for donations.
All the donations will go through PayPal, so you can use your paypal account or pay via credit card. All donations will help me provide YOU more free patterns, hopefully better, PDF version so they can be downloaded.
If this pattern gets a good response, I will start work on converting all of my free patterns into PDF version, that way they can be downloaded for easy use. Converting will take alot of time rewriting, time hooking up the patter for clean professional photographing (well as professional as I can get) instructions providing semi-step by step photos of the pattern.

Please when you make a Donation, provide an email address where you wish the pattern to be sent to. Please allow up to 48 hours for pattern delivery, I will do my best to send it ASAP when PayPal notify's me of a donation.
 To make a donation please log into your PayPal account, under the 'Send Money' tab please select 'goods or services. I removed the Donation link I had up, after the first donation I revived had 33% taken out of it. You can feel free to donate any amount you wish. There is no minimal fee. Please use the email provided in the image below and make sure to note the email address you wish the pattern to be sent to. If no address is provided I will send the PDF to the email account associated with the PayPal account that sends the donation.
Wednesday, December 18, 2013
Christmas Gift Pattern-ish
 I was wrapping gifts today, and I was thinking of all the yarn I had and if I had it in me to squeeze out one more thing before christmas.
So here it is took me about 3 hours give or take as I was working on it on and off.
The close up is more true to the color of the yarn, I just have not had any luck with lighting lately.

This worked up fairly quick, I used 2 skeins of Twilight Merino Wool, 1 skein of Grape Crush Angora, 1 skein of Acrylic/Nylon blend Silver.
To make this I just held all 4 yarns together and working with a Q hook (16mm) I chained 62 stitches made sure not to twist my chain I slipped into the starting stitch and worked in the round for 12 rounds, then I ran out of the Angora I switched over to a N (10mm) hook with the remaining 3 strands I put two single crochet into each stitch for one round to finish it off.
I am not sure who I am going to give this to. I am tempted to keep it for myself but I dont think I would put it to good use, I already forget the blue wavy cowl I made last year every time I go out. Its a nice thick cowl that would be verry warm, and since its very cold out now I hope who ever ends up with it uses it and loves it.
By the way it is long enough that it can be twisted and doubled up to add extra warmth and coverage on the head.
Subscribe to:
Posts (Atom)