Showing posts with label toy. Show all posts

Thursday, July 17, 2014

Flower Hat Octo-Jelly


I am moving on to making some items for Animeggroll to take to the Japanese Festival.  This is my flower hat OctoJelly.

You may rember my trial run of this pattern back around June 27th.  Well I worked it out so they now have 8 legs instead of 6.      

The pink and tangerine (rhss colors) was my second go at this pattern.  It still didnt feel right to me, the flower part made gaps that where just to big for my liking and the stitch count on the decrease after tentacles was leaving even bigger holes, so I made farther adjustments with the navy, sky, and steel (rhss colors) OctoJelly to reduce holes on the flower and eliminate any gaps/holes on the closing rounds.        
           
I plan on making a few plain OctoJellys and at least 4 of these Flower Hat OctoJellys.

I think I like the tri-color look of the Flower hat OctoJelly better then the bi-color.  I think I will make an other pink, tangerine, and bubble gum FHOJ with the flower in bubble gum and  tangerine, leaving the body to be worked in pink which is lighter then bubble gum.

Heck now I am getting all fired up about color combos.

I am now thinking of a 'Stormie' OctoJelly with the flower in shades of grey the body in white to look like a storm cloud and the legs in rainbow color but I need to figure out what the extra 2 leg colors should be.  Maybe gray, white, or a lighter/darker shade of one of the rainbow colors.

Hrm pink flower with punch trim  (maroon) and purple body...

What about yellow flower with navy trim and a same yellow body?

Or a white and red like the Japanese flag with the 'red spot' of the flag being the red flower with a white body.

I just realized I am now using color inspiration and the blog to procrastinate from cleaning... shhh dont tell anyone.

Thursday, January 16, 2014

Cat Toy for Charity


I hate having to take my older cat Dayton to the vet.  She is not feeling well and I knew a trip was nessary, and the vet has a lot of kittens in the office that still need re-homing/fostering.  I figured to try and ease my stress over the visit I would make some toys to donate to the kitties. 

Our younger cat Connie loves the toys so I am sure the kittens will get a kick out of them.

These three toys are simple to make if you  know how to crochet in the round, DC, work around a chain, work around a post.

Ball w/Tail
MR-6 [6]
Inc all [12]
Inc, sc [18]
SC all -3 rounds-   [18]
Dec, sc [12]
dec all [6]
Stuff with some catnip, and either poly fill or if you want a heavy toy poly pellets or rice
Pinching the 6 remaining stitches together slip stitch the first and last st's together and across.
Chain up from the last slst by 20 (more or less for longer shorter tail) +2chain, then put 3 DC stitches into each chain stitch all the way back up and slip into the start of the last round where you slst it closed and finish off  weaving the tail in.

Spirals
Chain 20 (more for a longer spiral) +2 for turning chain, and put 3 DC into each stitch of the chain back across.   Just like the tail in the Ball w/tail pattern.

Flower Teaser

Chain 4, DC into the first chain st (this is the stitch you will be working into for this round), chain 1 dc back into the same space as before, Repeat the Ch DC till you have 7 (counting your starting chain) post then chain and slst into the  starting chian in the 3 st. 

This should leave you with 'wheel' with 7 spokes.  This is the base frame work for the flower you will be working around the chain spaces for the peddles next.

Start by chaing up 1, then working in the chain space (working around the chain and not into the chain stitch) SC DC DC SC  repeat in each chain space. Slip Stitch into the first peddle.

If you want you can do the second round in a new color [if so FO with starting color and  in new color make a slip stitch around a post from back to front and chain 5] if not continue on--

Chain  3  slip stitch from the back of the flower around the post and make a slip  stitch. chain up 5,  DC around the next post from back to front chain 2 and repeat around ending in a chain 2 slst into the  3rd chain from the starting chain 5  This is a base frame for the 2nd round.

Peddle round - Ch 1 SC DC3 SC into first chain space and around.

You can keep working rounds for a more poofy flower, just increase the chains by 1 each frame round, and add Dc or even Triple croches into the peddle rounds.

I left a long chain tail on mine with a small loop so the flower could be hung in the cage from one of those elastic teaser toy hooks, or even used with one of the cat rods.


All of these patterns can be made with scrap yarn.   As always if something isn't clear let me know, I would love to see how yours turn out!

Thursday, November 21, 2013

For the little baker --Pattern--


These where requested, to go with a custom made kid kitchen.  Four hot pink, and black pot holders and a black and pink oven mit.

The oven mit threw me for a loop tyring to make the thumb, I thought would be easy.  Next time if there is a next time I will make the thumb sepratly and attach it at the end.   I ran out of the pink I was using part way threw so one of the pink with black trim's pot holders has a thicker trim than the other but I kind of like that.

Child Pot holders pattern-
Chain 4, DC 2 into the first chain, *chain 2 dc 2 into same spot* repeat two more times (so you have 4 clusters of 2dc's) chain 2 slst into the first dc

From here out you will DC into each DC an on the corners (the chain space) you will DC2 chain 2 DC 2 join with a slip to the first dc


I worked these kid sized ones for 4 rounds in the main color then did a round of sc (4 sc in each corner) in the trim color.  In the last corner sc 2 chain 8 then sc 2 and finish round.

Child Oven Mit
MR- DC 10
DC inc all 20
Dc all  
-repeat for 3 more rows-
In contrast color, do a row of SC
Switch back to main color
Dc all the way around but stop two stitches from the end, chain two then slip stitch into the first dc
that space we just made is the area for the thumb
In contrast color I worked 8 sc into the space (two in the previous row  two in the sides of each dc and 2 in the chain) then I worked it for 3 rounds, and decreased ever other stitch on  the 4th  and 5th rows and weaved the end shut.     --If I ever do this again I will make the thumb sepratly, by Mr 4, Inc all (8), sc all for 5 rows then sewing it into the mit.--

In black, work dc all the way around the mit, puting 2 dc into the chain 2 space
work in Dc for two more rows.

I did a scalloped edging, instead of chaining up after the slst.  
Starting from the slst dc in the second st from the hook 4 times, skip one stitch then slst in the next stitch,  repeat once, chain 8 and slst back into the last slip and repeat the Dc4 slst pattern all the way around.


Tuesday, May 14, 2013

Abnormal Unicorn


 Here is my Abnormal Unicorn, I was inspired to make this when I was commisioned to make a Funnie Bunni


Things needed to make this are:
White yarn, roughly 10 yards or less
Gold or Silver yarn, for Horn and hooves less then 2 yards
Blue/Purple/Red/Orange/Yellow/Green yarn scraps for the mane and tail less then a foot of each color
I used an F (3.75mm) hook for the body/head/feet
darning or yarn needled to sew horn and hooves to the body
15mm Safty eye's (or you can felt black felt on)

I am from the US so I am using the US crochet terms the only things you need to know to make this pattern are, MR (magic Ring), SC (single crochet), INC (increase), and DEC (decrease). Some other terms I may use rnd=round, st-stitch, yo-yarn over.

Even if you have never crochet before this should be simple.  If you have never worked in the round before don’t be scared its easy!

Here is a link to the video I made when doing my Penguin to show how to start in a MR its exactly the same.

Head/Body Section

MR-6 (in white yarn)
R1 inc -12
R2 sc inc -18
R3 sc 2 inc -24
R4 sc 3 inc -30
R5-9  sc all -30
R10  sc 3 dec -24
R11  sc 2 dec -18
R12  sc dec -12
R13 dec -6

Hooves 4X

MR 6 (in gold/silver)
R1 sc 6 (color change to white at end of round)
R2 sc 6
R3 sc 6 (leave a long tail to sew into body with) 

Ears X2   -UPDATE 4/7/18-

chain 6, sl st into the 2nd st from the hook, sc, hdc 3, sc 2 into the last hdc turning and hdc into the same st again, hdc 2, sc, slst and finish off.

I have added a chart of this section to help with clarification.  The red chain is the starting stitch, the blue slip stitch is the ending stitch.

Horn

 MR 4, sc for 5 rows or for as long as you want the horn


Assembly 

Add eyes, I placed mine between the 7-8 rows. Stuff and sew body shut.  I didn't need to stuff my legs any more then just pushing the tails of my yarn and color changes into the legs, but if you want them firmer sew them half way onto the body and finish stuffing before you sew them the rest of the way.  I sewed them into the rows 10 threw 12, my front lets set wide under the eyes, and my hind legs closer together for stability.
 I sewed the ears on about 5 st's back from the eyes and a row up, on the same row but in the middle of the eyes I added the horn.  From here I did the mane, you can do it any way you want but this is how I did  it, I used a size D hook and used it to pull two strands of a color at the same time threw a stitch starting with the row directly behind the horn.  Make sure if you do it this way you always pull the yarn threw the same way so they all lay the same way. I went in from right to left (eyes facing me) and it made the mane lay to the right (when held eyes facing me).
 For the tail I added two strands of each color  onto a separate strand of yarn. I did a hitch knot, folding the strands over the base strand and pulling the tails threw securing them. I did this for each color then tighten the base strand and knotting it into a loop that I then sewed onto the base of the body. 

I wish I had made the tail longer, I pre cut all my strands for the mane and tail to 4 inch's (folded over so they are all 2inchs long) I think a longer tail would have been more appealing but it was just right for the mane. 


As always if something isnt clear just let me know and I will do my best to explain and/or provide video/pictures. 

Monday, September 17, 2012

My Neice enjoying some of the crochet toys I made


Little Miss Jordan and all her toys.


I have made a lot of toys for my neice over the past few months. By far her favorits are the Octo-Jelly's so its rare to get pictures of her playing with the others but her daddy managed to catch a few shots. Her she is seen playing with a little blue elephant while her newest toy the Panda Bear watches from her lap. I have been asking her mom to get shots of her playing with the elephant and she told me every time she hands it to her she acts like it has offended her so I am happy to see her enjoying it.


Here is a bigger shot of the elephant she is holding. When I was making it I was half temped to add a rattle like toy to its head so it would make some noise to drive them crazy but then I rethought that idea and went the safer rout of no rattle.


It was bound to happen though, she threw the elephant away in favor of her Panda Bear.


I think she is trying to tell her daddy something.  Maybe its- "I want more Chinese food none of that mush you call baby food." While nomming on her pandas leg.


 It has a cursive J monogrammed into its shirt  for Jordan.  I didn't make a mouth because it would leave loose strands of yarn or embroidery thread that she might get her tiny fingers tangled in or even figure out how to rip them out.   I felted on the eye patches and the nose.


And here she is with her favorite toy the Octo-Jelly. She seems to love squeezing their heads and pulling on their streatchy spiral legs. Last time I got to visit with her when I gave her the panda she seemed more impressed with my bright orange soda then anything else, so I made her a bright orange Octo-Jelly that still needs me to felt eyes onto it before I can give it to her.


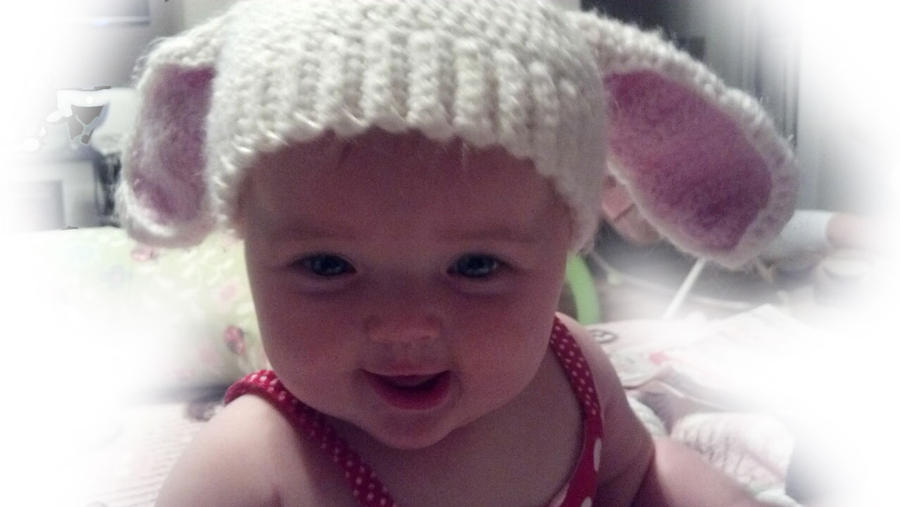
Lastly here she is sporting the Bunny/Lamb hat I made for her, the ears depending on how you posistion them will make it look like a Bunny if they are upright or if you pull them stright down they have a cute little Lamb appeal to them.


Oh just a side note, if you wash a knit or crochet item NEVER put it in the dryer it will shrink!! If that happens just soak the item in some warm water with soap, rinse with warm water roll in a dry towel to get out most of the wet, then use a piece of cardboard cut to the side you want to stretch it out to the size you need it to be and let it air dry. Toys on the other hand should do just fine if they shrink up a little its not as big a deal because you don’t wear them.