Showing posts with label octopus. Show all posts

Friday, November 14, 2014

Off to RESOBOX Amigurumi Exhibition in NY


These guys are all boxed up and will be on their way to RESOBOX this weekend.

22 items, no direct repeats.

1-Horned Owl, Snowy Owl, Cthulhu, Scarfed Doll, seahorse, horse, catagurumi

2- Abnormal Unicorns (rainbow/blond), Donuts

3-Octopi, Flower Hat Octopi

5- Assorted Dragons

If you will be in New York during the Dec 12 2014-Feb 28, 2015 please drop in on RESOBOX and see all the Amigurumi that has been sent in from all over the world for this exhibition.

I would love to visit but will have to settle for seeing it threw other peoples photos.

Thursday, July 17, 2014

Flower Hat Octo-Jelly


I am moving on to making some items for Animeggroll to take to the Japanese Festival.  This is my flower hat OctoJelly.

You may rember my trial run of this pattern back around June 27th.  Well I worked it out so they now have 8 legs instead of 6.      

The pink and tangerine (rhss colors) was my second go at this pattern.  It still didnt feel right to me, the flower part made gaps that where just to big for my liking and the stitch count on the decrease after tentacles was leaving even bigger holes, so I made farther adjustments with the navy, sky, and steel (rhss colors) OctoJelly to reduce holes on the flower and eliminate any gaps/holes on the closing rounds.        
           
I plan on making a few plain OctoJellys and at least 4 of these Flower Hat OctoJellys.

I think I like the tri-color look of the Flower hat OctoJelly better then the bi-color.  I think I will make an other pink, tangerine, and bubble gum FHOJ with the flower in bubble gum and  tangerine, leaving the body to be worked in pink which is lighter then bubble gum.

Heck now I am getting all fired up about color combos.

I am now thinking of a 'Stormie' OctoJelly with the flower in shades of grey the body in white to look like a storm cloud and the legs in rainbow color but I need to figure out what the extra 2 leg colors should be.  Maybe gray, white, or a lighter/darker shade of one of the rainbow colors.

Hrm pink flower with punch trim  (maroon) and purple body...

What about yellow flower with navy trim and a same yellow body?

Or a white and red like the Japanese flag with the 'red spot' of the flag being the red flower with a white body.

I just realized I am now using color inspiration and the blog to procrastinate from cleaning... shhh dont tell anyone.

Friday, June 27, 2014

More procrastination...?

I swear I am working on getting my patterns all typed up and bundled. While doing it, I had an idea.  What would an Octo look like if I made it with a African Flower motif to start.  This is the result, I know if I make a second I have to work on the flower part as it left gaps big enough for stuffing to seen which means it can be pulled/worked out.  I used the left over yarn from my purse and scraps from the pillow shame I made back in april.


I am currently working on a Mythic Amigurumi Booklet that will have the patterns I wrote for chibi dragons, cthulhu, abnormal unicorn, and a dragon egg pouch.

Saturday, June 14, 2014

Sealife Pattern now in PDF Download!

I have had a bit of down time durning the convention this year and I am using it to work on getting PDF version of the more popular patterns I have  up on my site.

By far my Sealife Critters gets the most views per day so I though I would get it up first.
Sealife Critters <~~~~<< download the PDF and let me know what you think!


Monday, March 10, 2014

Sea Creatures *Patterns*

***UPDATE*** You can now download the PDF booklet for these patterns

I was asked by my aunt Mary to work up a few sea creatures for a friend who is about to have a baby girl.

I am going to start off with a dolphin pattern--
Dolphin,
Worked nose down.


Dolphin
Grey yarn - worst weight
H hook
Stitch Marker

Start off with a magic ring or your preferred starting in the round method.  Here is a video of me showing you how to start a magic ring (from my penguin pattern).   I am working in a continuous spiral which is why I am using a Stitch Marker so I can keep my count.If you like, you can slst and join rounds at the end of each round everything else should work exactly the same.  Make sure to stuff as you go, and add in your eyes (if your doing safety eyes).
Start of the Decrease

R1 Sc 3 (3)
R2 Sc all (3)
R3 Sc all (3)
R4 Work the next four stitches into the same stitch (its an increase)- HDC DC3, in the next stitch work DC3 HDC, Sc in last stitch. (9)
R5 *Sc 2, inc* repeat (12)
R6 *Sc 5, inc* repeat (14)
R7-8 Sc all (14)
R9 *Sc 6, inc* twice (16)
R10-12 Sc all (16)
R13-14 Sc 4, hdc 8, sc 4 (16)
R15-16 Sc all (16)
R17 Sc 6, dec twice, sc 6 (14)
R18-19 Sc all (14)
R20 Sc 4, dec, sc, dec, sc 4 (11)
R21-22 sc all (11)
R23 sc2, dec, sc 2, dec, sc 3
R24 sc all (9)
R25 *Dec, sc* repeat
R26-27 Sc all (6)
R28 Stuff it as much as you want now, this row will close off the body. - Sc 2 (or how ever many it takes to get to the side of the tail) Pinch the opening closed flat, SC threw first 2 stiches held together, then sc threw the next 2, and last 2 (3)

Start of tail.

R29 Chain 5, sc in 2nd ch from hook, hdc, dc2 , hdc, slst (the slst should be in the middle of your 3 sc from the body), slst, ch 5, sc in 2nd ch from hook, hdc, dc2, hdc, slst (the slst should be in the middle of your 3 sc over prevous slst) FO

Dorsal Fin Make 1

Chain 6, sc in 2nd ch from hook, hdc inc, dc, extended dc (yarn over, put a hook threw the stich pull up a loop, yo and work one loop, then yarn over and work 2, yo work 2), ext dc, fo leave long tail for sewing onto the top of the body

Sew the Dorsal fin onto the top of the body, making sure you are sewing along the last ext dc to the bod. I sewed mine in starting at row 13

Side Fin's Make 2

Chain 5, sc in 2nd ch from hook, hdc, dc inc, ext dc inc, fo leave long tail to sew into body.

Like with the Dorsal fin, sew along the last ext dc into the body.   I sewed mine in on row 10/11 depending on on which side your sewing it to (the spiral will put one starting at 10 the other at 11 if you joined all your rows then start them in the same row).

If you used safety eyes you are finished!

If you didnt use safety eyes, either sew on buttons/beads, embroider on eyes, or felt on eyes.  I used some black ww yarn, and made french knots for eyes so it would be safe for the baby this toy is going to.


Octopus, and a Jelly fish.
They will be nearly the exact same thing,with the Jellyfish having one extra step for its ruffle.

I will be using my Octo pattern found here,  I will add the pattern with the Jellyfish adjustment here, the adjusted row will be all in bold so if you wanted to make a cute pair like I am you don't have to go flipping threw the site looking for it just skip the Jelly row, also with some minor adjustments so it has 8 legs instead of the 6 in the original pattern.

For the Octo I will be using-
Yellow ww yarn
Black yarn for eyes
H Hook
Stitch Marker (working in continuous rows)

For the Jellyfish I will be using-
Pink WW yarn
Black yarn for eyes
H Hook
Stitch Marker (working in continuous rows)


R1-Magic Ring 8 sc

R2- Increase (Inc) in each stitch (16)
R3- Inc, sc repeat all the way around (24)
R4- Inc, sc2 repeat (24)
R5-R10 SC all (32) (you will repeat this round till you have 8 rows)
R11- Dec, sc2 (24)
JELLYFISH ROW- This is worked in the front loops of row 11-skip if you want a normal Octo
Finished Leg, next to a Ch 14 so you can see the size difference.
R11JF- I slst my gray yarn, into the front loop of the previous row and chained up 3.  If you want the jellyfish ruffle to be the same color as the body just slst into the first front loop with working yarn then chain two.  Work 3dc into each FLO st all the way around ending with a slst into the top of your starting chain, FO (or if you working in one color slst three times into the post to get the working yarn back to the working stitch row.
 R12- Dec, sc (16) This will all be worked in the back loops of row 11 not the R11JF.  If using safety eyes you should add them now.
 R13-Legs row- Dec in the front loops only, chain 14, Dc 3 in the 3 chain from hook, dc2 into each chain back up (Your leg length will be about 1/2 to 2/3 of the size of your chain, so if you want smaller/longer leg's just chain less/more stitches, with ch 14 my leg's will be short) Repeat 7 more times leaving you  with 8 legs and 8 sc. sl st into the first dec.  (8)
 R14- Dec all in back loops of R 13(8)
FO leave a long tail.  Weave tail threw 8 stitches, stuff firmly, and cinch the bottom close and secure weaving tail threw the body.

If you didn't use safety eyes, now is the time to sew/felt on your eyes.

I crocheted mine-

Eyes make 2-
 MR Sc 6 FO, leave long tail for sewing and embellishing the eyes.


Clown Fish

I will be using the following-
Orange ww yarn
White ww yarn
H hook
Stitch Marker

This pattern is worked with the rounds joined, not continuous as the previous patterns.  So you need to know how to do a color change (work the last yo in new color then pull threw before doing the slip stitch to join the round), end each row with a slst and chain.  I do not cut the yarn between color changes, I carry it up along the inside, you can cut color changes if your not completable working with 2 strands at a time.


With Orange
R1- MR sc 6
R2- Inc all (12)
R3- Inc, sc (18)
R4-5- Sc all (18)

R6- Inc (do 3 stitchs into one), sc 8, Inc ( 3 in 1), sc 8 (22)
R7-8- Sc all (22) Switch to white on the last pull threw of last stitch before you join round with slst
R9- Sc, Inc (3 in 1), sc 10, Inc (3 in 1), sc 9 (26)
R10- sc all (26)
R11- sc all (26) Switch to Orange at end
R12-15- sc all (26) Switch to white at the end of round 15
R16- Sc 2, dec  (3 into 1), sc 10, dec  (3 into 1), sc 8 (22)
R17-18- sc all (22) Switch to Orange at end of R18
R19- Dec (normal Dec this round where you only work 2 into 1), sc 4, dec, sc 4, dec, sc 4, dec, sc 2 (18)
R20-Sc all (18)
R21- Dec (2 in 1 normal again), sc 4 -repeat 3 times(15)
R22- Sc all (15) Switch to white
R23- Dec (2 in 1), sc 3(13)
R24- Sc All till 2nd from last stitch then dec (12)
R25- sc all (12) Switch to orange and secure white yarn and cut it off
R26- sc all (12)
You should make sure your eyes are in if your using safety eyes, and finish stuffing.
R27- Slst loosely into the first and second stitchs. Now like in the dolphin pattern we are going to pinch the opening shut, and sc across it (which is why we did the slst to get to the starting point for the closur make sure you are making it from top to bottom and not side to side as with the dolphin). Ch 1, sc across threw both layers (6)
R28-Ch 3 (counts as first dc), Dc 3 times in the first stitch, 2 Dc in next st, Dc next 2 st, Dc 2 in the next stitch, Dc 4 in the last stitch. (12)
R29- Sc all FO (12)


Side fin's 2-in orange
Ch 6, sc in 2nd ch from hook, hdc & dc in next ch, ext dc in all remaining ch st (7)
Ch and turn, sc across, sc twice in last stitch, and work along the bottom (ie no chain and turn) sl st across (should be 5 st) FO leaving long tail for sewing to body

Top Fin

Ch 6, sc in 2nd ch from hook, hdc remainder ch st's.  Work 2 sc into the post of the last hdc and FO with a long tail.

I made the same eyes from the previous pattern, all that is left is to sew everything in!


Simple Star Fish Pattern


This pattern will be so simple.

Legs -Make 5

R1- MR 6
R2- Sc all
R3- Sc all
R4- Inc, sc2 repeat (8)
R5- Sc all
R6- sc all
R7- sc all
R8- sc all

Leave a tail for sewing legs together.

Once you have all 5 legs, stuff them, then holding two legs together sew two stitch across both legs, skip two stitches on one leg, pick up new leg and tail and sew together two stitches of both legs.  You should have two stitches on either side of the connected legs that are unworked, continue this till you have all 5 connected and form a ring with the first and last legs sewing the same middle set of 2 stitches together.  Now all you need to do is whip stitch along the top stitches that where unworked, and cinch them shut and repeat on the bottom with one of the tails.  Weave in all ends, tucking all tails and you are done.


Seahorse Pattern
Seahorse on a stick!! (stick not included)


1- mr 4 slst ch1
2-sc all
3- inc*3 all  slst ch 1 (12)
4 sc all
5 sc all
6 sc 2, hdc 8, sc 2
7 sc 2, hdc dec 4, sc 2 (8)
8 sc, hdc 6, sc
9 sc, hdc 6, sc
10 sc all
11 sc all
12 inc 2, sc 4, inc 2 (12) (switch to continuous rounds)
 slst 4 -This is the  new star of the round of each round make sure to put your Stitch Marker here.  All remaining rows worked in BLO-
13 sc all (12)
14 sc 6, inc 6 (18)
15 sc all
16 sc all
17 sc, dec 2, sc rest  (16)
18 dec 2, sc 5, inv 2, sc 5
19 sc all
20 dec 2, sc rest (14)
21 dec, sc5, dec, sc 5 (12)
22 dec, sc 4, dec, sc 4 (10)
23 sc 2, dec, sc2, dec, sc2 (8)
24 dec, sc 2 rpt (6)
25 sc all
26 hdc 3 slst 3
27 sc all
28 sc 2, dec 2 (4)
29 sc all
30 sc all
31 dec, sc (3)
32 sc all
33 sc all
34 sc all
35 sc all

Leave LONG tail, fnish off and close up tail.  Roll the tail in a spiral like in the picutes and sew it as you roll to secure it.

Dorsal Fin

Chain 6, in the 2nd chain from hook sc across.
Chain 2 turn and hdc back arosss and slst down theend side.

Leave long tail to sew into the back of the body with.

I made french knots out of some black yarn for eyes but feel free to use safty eyes or buttons or beads.


Great White Shark
Last but not the lease, my shark!

1 mr 4
2 sc all
3  inc sc
4 inc all
5 sc all
6 sc all

7 switch to white- inc, sc2 inc, switch to gray, sc 2, inc, sc 2 repeat
8-White-inc, sc 4, inc, GRAY-inc, sc 3, in 2, sc 3, in
9- sc all White in white, gray in gray
10-18- sc all White in white, gray in gray
19-grey dec, white sc 4, grey dec, sc6, dec*3, sc 6
20- sc all grey
21- dec, sc 4
22- sc all
23-dec, sc3
24- sc all
25-dec, sc 2
26- sc all     


Tail 

Pinch opening closed and sc it shut in the same manner as the Dolphin tail.  Ch 5, slst in 2 ch from hook, sc, hdc, dc 5, ch 4, slst in 2nd ch from hook, sc all slst in last st

Fin's

Ch 6, sc in 2nd ch from hook, hdc & dc in next ch, ext dc in all remaining ch st (7)
Ch and turn, sc across, sc twice in last stitch, and work along the bottom (ie no chain and turn) sl st across (should be 5 st) FO leaving long tail for sewing to body.

I did french knots again for the eyes.

I think if I make an other shark, I will need to adjust the belly patch so it doesn't have that slant to it.




Monday, September 2, 2013

Octo Amigurumi Rewrite!

I got a request to rewrite my Octopus pattern, some people where having a hard time reading the Blue font agains a grey backround.  So here it is---

Amigurumi Octo

A beginers tutorial and pattern

You will need the fallowing--
A small amount of yarn any color you like- if its balled the size of a tennis ball should be more then enough to make one or even two
A stitch marker so you can see where your rounds starts and stops-  I used to use a scrap of contrasting yarn but I have had it get pulled out on accident (I think the cats do it on purpose but i will call it an accident till I catch them) so now I just use a bobby pin and it works great but like i said you dont have to go out and buy some fancy set of stitch markers a scrap of yarn will do (unless you have kitties like mine)
Crochet hook- Any size will work but check the lable of the yarn you are using (if there is no label just the thinner the yarn the smaller the hook the thicker the larger) The smaller the hook the smaller the finished item with turn out and vice versa large hook large octo.  I just used a US size F hook because my yarn is WW
Stuffing of choice -I use polyfil
Eyes - I used Safty eyes because they are child safe , but you can felt on eyes, or sew buttons on as eyes, or even embroider on eyes!
Yarn needle for finishing.

HEAD
You can start any way you feel works best for you I show two methods for how I start


 Start A Chain 2, then make 6 sc in the second chain stitch from the hook (the first loop)

 Start B Magic Ring 6 sc  (here is a video of how to start with a magic right it was made for my Penguin but its the exact same process )
R2- Increase (Inc) in each stitch (12)

 R3- Inc, sc repeat all the way around (18)

 R4- Inc, sc2 repeat (24)

R5- Inc, sc3 repeat (30)

R6-11 SC all (30) (you will repeat this round till you have 11 rows)

 R12- This is the decrease and leg's round- you can choose if you want to work the legs as part of the body (so you dont have to sew them on later) or if you want to have more then 6 legs just work the decrease and ignore the parts in bold where I have you chain a length to add in the legs.  I am going to have you do a FLO (front loops only) decrease which means you only hook under the loop closes to you and not both loops of a stitch this leaves a more eye appealing decrease and does leave a large gap that a normal decrease can cause.
 Work one dec, 'chain 22 (or if you want the legs longer/shorter chain more/less) DC twice into the 3rd chain stitch from the hook (I tend to add 3 or 4 if I am working with a thin yarn to get the twist really started), then 2 DC in each chain (or more if you want a tighter spiral) then SC into the next st' sc2  repeat from begining You should end up with 6 legs and 24 st's

 R13-Dec sc 2 (18) The dec should fall right at the leg spirals so you can just pick up a stitch on either side of the legs and work those for the dec and sc all other stitches

 R14- Dec, sc (12)

 From here you want to finish off the work, start by attaching your eyes and any other features you may like, then stuff.  I like to weave my working yarn tail threw the front loops of the last round of stitches and cinch it tight then secure and sew it shut. If you did the legs separate this is when you should find a placing you like and sew them in. I find between rounds 12-13 look best. The images I have of my progress where worked with the legs not attached but the process is exactly the same if you fallow the pictures and work them as part of the body.


I sorta rushed threw this so if something is unclear or worded in a way you dont understand just ask and I will help out!!
Felted eyes with a Jellyfish fuffle above the legs


Saturday, October 6, 2012

Halloween OctoJelly

So the last time I saw my niece she was captivated by the bottle of orange soda I was drinking.  Her eyes light up and fallowed it when ever it was in her line of sight.  So I am convened for right now her favorite color is Orange!!  So I made her a bright orange octojelly with triangle eyes to give it a Halloween theme.  Once again my camera from my cell phone does the color no justice.   The main body has been finished for a while I just didnt felt eyes on till today because I am lazy, and I knew my sis wouldnt be coming over any time soon to get it. 

Monday, September 17, 2012

My Neice enjoying some of the crochet toys I made


Little Miss Jordan and all her toys.


I have made a lot of toys for my neice over the past few months. By far her favorits are the Octo-Jelly's so its rare to get pictures of her playing with the others but her daddy managed to catch a few shots. Her she is seen playing with a little blue elephant while her newest toy the Panda Bear watches from her lap. I have been asking her mom to get shots of her playing with the elephant and she told me every time she hands it to her she acts like it has offended her so I am happy to see her enjoying it.


Here is a bigger shot of the elephant she is holding. When I was making it I was half temped to add a rattle like toy to its head so it would make some noise to drive them crazy but then I rethought that idea and went the safer rout of no rattle.


It was bound to happen though, she threw the elephant away in favor of her Panda Bear.


I think she is trying to tell her daddy something.  Maybe its- "I want more Chinese food none of that mush you call baby food." While nomming on her pandas leg.


 It has a cursive J monogrammed into its shirt  for Jordan.  I didn't make a mouth because it would leave loose strands of yarn or embroidery thread that she might get her tiny fingers tangled in or even figure out how to rip them out.   I felted on the eye patches and the nose.


And here she is with her favorite toy the Octo-Jelly. She seems to love squeezing their heads and pulling on their streatchy spiral legs. Last time I got to visit with her when I gave her the panda she seemed more impressed with my bright orange soda then anything else, so I made her a bright orange Octo-Jelly that still needs me to felt eyes onto it before I can give it to her.


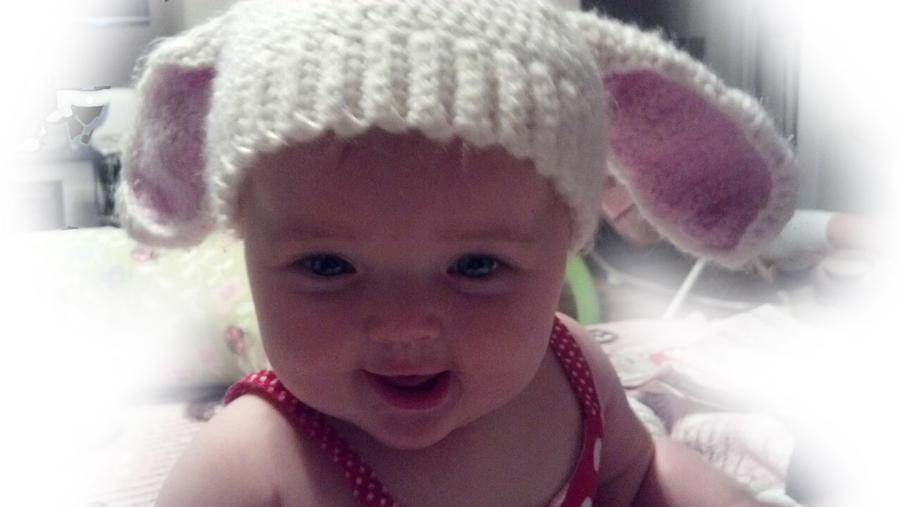
Lastly here she is sporting the Bunny/Lamb hat I made for her, the ears depending on how you posistion them will make it look like a Bunny if they are upright or if you pull them stright down they have a cute little Lamb appeal to them.


Oh just a side note, if you wash a knit or crochet item NEVER put it in the dryer it will shrink!! If that happens just soak the item in some warm water with soap, rinse with warm water roll in a dry towel to get out most of the wet, then use a piece of cardboard cut to the side you want to stretch it out to the size you need it to be and let it air dry. Toys on the other hand should do just fine if they shrink up a little its not as big a deal because you don’t wear them.

Sunday, September 16, 2012

How to make amigurumi Octopus Tutorial

So my niece Jordan who gets a lot of my creations absolutely loves my Octo-Jelly's  as they call them.  She is 6 or 7~ish months old (BAD auntie for not knowing) and her mom had to ask me to make her some more because when they take it away to wash it she apparently gets very upset.

I made a Tutorial on deviant art when I first started making them, but I have improved on it or at least made it easier on me to make them in one whole piece.

This little octo amigurumi is probably the easiest to start off with if you have never crochet in the round before.  It simply is a ball, with spirals attached if you fallow the tutorial I made earlier.  The adjustment I made to make it easier is incorporating the spirals into the ball.  On the first decrease row after each decrease (you work the decrease and pull the loop threw three loops) I would chain a length about 22 ch and put 2 DC in each stitch up or more depending on how tight you want to make the spiral part of the whole body then sc into the next st fallowing the pattern for dec and sc's.  Then on the next round the decrease should fall right at the spirals so you just pick up a stitch on either side of it and decrease.  Working it this way will leave you with 6 legs, but you can always adjust the pattern to fit in 2 more I just prefer it this way as the spacing with the decreases works out looking cleaner.

Feel free to use my pattern and give credit to me but DO NOT claim it as your own or sell it if you want to give it to someone link back to here or my DA please.  I ask if you want to sell anything made with my pattern please donate part of your profits to a local No-Kill Shelter or Animal Rescue group even just $.30 will feed a hungry animal for a day. Not necessary but its a kindness I pay forward by not charging for the pattern.

Below are some of my Octo-Jelly's I have made.

Open Commisions!

I have open time for Commissions.  Keep in mind these items are HAND MADE in a ANIMAL friendly environment.  With all my animals its imposable to make sure they dont some how come into contact with my yarn stash, I do however try my best to keep all commission projects in their own bags but if I am not careful I will come back to a cat in a bag on what ever project I just put away weather i put it on top of the 7 foot tall book shelf or try to hang it from the edge of my desk.

I write all my own patterns and am willing to try making anything.  Stuffed toys, dogs, cat,s doll, monsters, scarfs, hats, you name it I will do my best to make it!  I wont ask for a penny till its finished and you have seen pictures of it and are happy with it. I try to keep my pricing reasonable but keep in mind shipping cost are out of my hands, i can give you a reasonable estimate if you provide a zip code (in the US) or country so you will know before hand.  I do payments through PayPal.

My pricing depends on what you want me to make!  But I am fairly reasonable you WILL NOT see me selling a 4in doll for $50 like alot of the dolls on etsy.  See something you like on etsy but dont like the price feel free to ask me and I will tell you if I think I can make it or not and what my price would be!

My small dogs, cats, dolls, chibi Cthulhus are all $10 +S&H  (about 3 to 5in tall)
  

Scarfs ranging 4-6ft long $10+S&H (length depends on the stitches used some will have more stretch as they are worn so they will be made a bit smaller unless requested.  Also can make them longer than 6ft but will have to charge an additional $.50 a foot ((AFTER 6ft)) up till 9ft. Add and additional $5 for a full scarf of complex stitches, or $2 for scarfs with fancy stitching 10in at the ends)


Hats $10 +S&H (depending on complexity if you want a peddle stitch hat like the stitch on my bag  it will cost a bit more because this stitch is more complex and will take me longer to work.)


All Images shown here are items I have hand made myself. Just a small sampling of what I can do for you.  You can view more of my work on my DeviantArt account @ embertouchtehfire.deviantart.com/